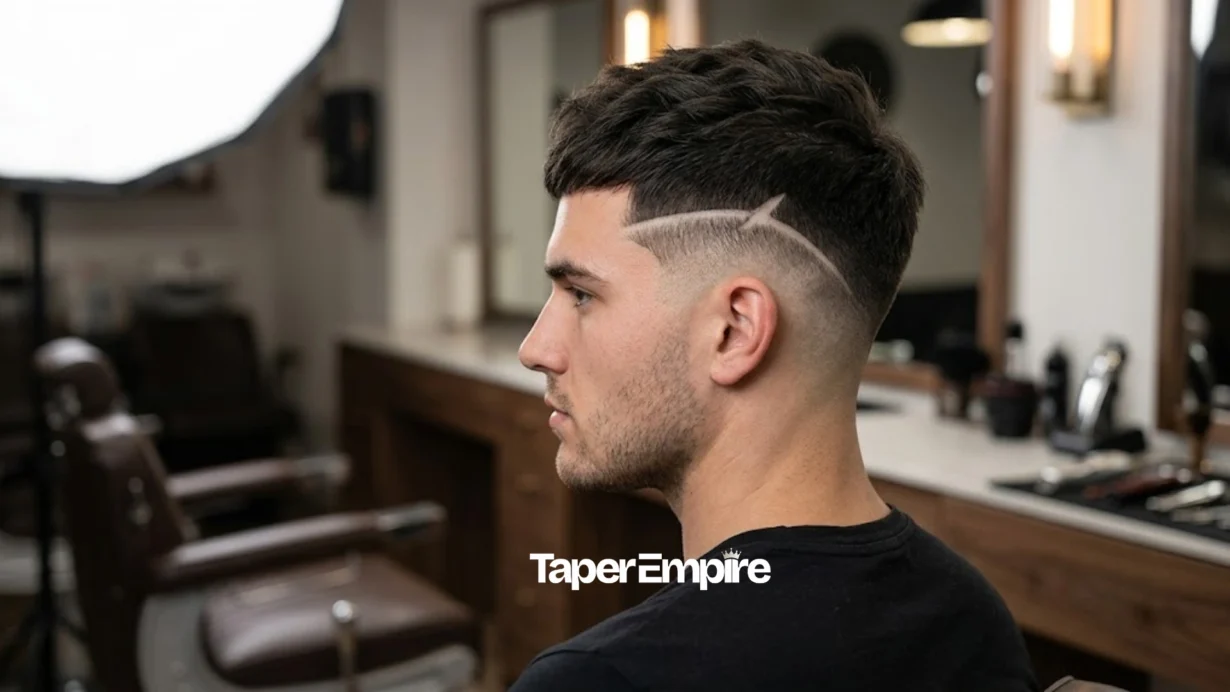

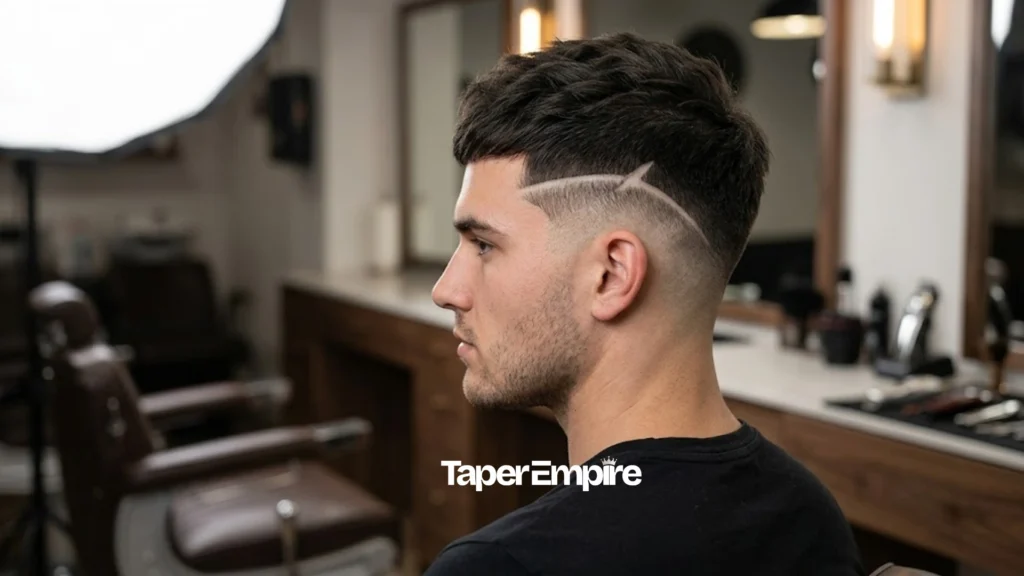
A high taper fade with design combines a fade that starts above the temples with razor-etched patterns shaved into the sides. This guide shows 28 design variations, exact barber scripts, hair-type matching, and maintenance timelines so you know exactly what to ask for before you sit in the chair.
What Is a High Taper Fade With Design?
A high taper fade with design is a men’s haircut in which the fade starts above the temples, while razor-etched patterns, lines, geometric shapes, or freestyle art are shaved into the faded sides. The design adds a personalized, visible detail to the standard high taper fade, with complexity ranging from simple lines to advanced custom artwork.
- Fade starts above the temples
- Designs are shaved into the faded sides
- Complexity ranges from simple lines to advanced artwork
- Requires more frequent touch-ups to keep the design sharp
Table of Contents
What Is a High Taper Fade With Design?
A high taper fade with design starts the fade above the temples and then adds razor-etched patterns to the tapered sides. The fade creates a gradient from longer hair on top to skin-tight or close-cropped sides. The design sits within that faded zone, using thin, shaved lines to create a visible contrast against the surrounding hair.
Razor design work traces back to Black barbershop culture, where barbers began shaving simple lines into fades during the late 1980s and early 1990s. Those early temple lines grew into the geometric shapes, wave patterns, and freestyle artwork barbers create today. Social platforms have accelerated the spread of new design trends, making razor patterns one of the most requested add-ons for a high taper fade.
A high taper fade with design has a few defining traits:
- The fade begins above the temples, not at the ear or neckline.
- Designs sit in one of three zones: temple, side, or nape.
- Simple line designs need less barber skill than freestyle patterns.
- Designs need touch-ups more often than a plain fade because shaved lines grow out faster than the surrounding hair.
Most barbers who work regularly with fades can execute a single clean line. Fewer specialize in the freestyle artwork covered later in this guide.
28 High Taper Fade Design Ideas
Twenty-eight design options are grouped below by complexity level, from simple single lines to advanced freestyle artwork. Each entry lists the design, where it works best, and what to tell your barber.
Simple Designs
These require only basic razor skills. Most barbers with fade experience can execute them cleanly.
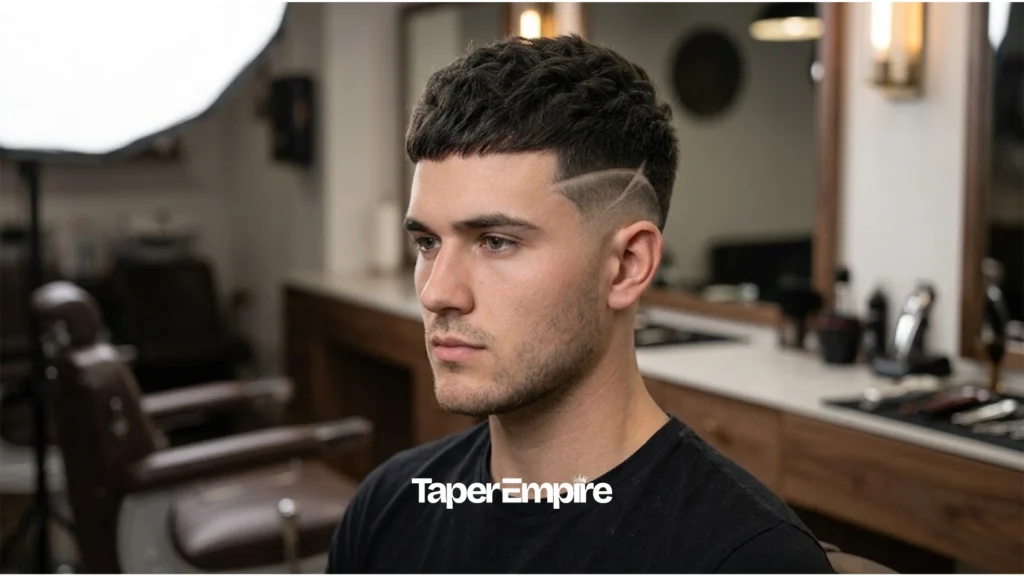
1. Single Temple Line: A single straight line shaved above the ear at the temple. Works on all hair types; shows sharpest on dark or coily hair. Suits oval and diamond face shapes. Ask for: “a single straight line at my left temple, about an inch above the ear.”
2. Double Parallel Lines: Two thin lines running parallel at the temple. Adds more visual weight than a single line without added complexity. Best on medium-to-thick hair for contrast. Ask for: “two parallel lines at the temple, spaced about a quarter inch apart.”
3. Triple Line Stack: Three lines stacked at the temple or side. Reads well on straight and wavy hair. Works for round faces because the vertical lines add length. Ask for: “three evenly spaced lines stacked vertically at my temple.”
4. Angled Temple Arrow: A single line angled toward the hairline, forming an arrow shape. Good on coily and curly hair for maximum contrast. Suits square and diamond faces. Ask for: “an angled line pointing toward my hairline at the temple.”
5. Straight Vertical Line at Side: A vertical line placed between the ear and nape, rather than at the temple. Works on all hair types. Fits most face shapes since it sits lower on the head. Ask for: “a single vertical line on my right side, between the ear and neckline.”
6. Diagonal Slash: A single diagonal line cutting across the side zone. Shows clearly on straight, dark hair. Suits oval and heart face shapes. Ask for: “a diagonal line across the side, angled from front to back.”
7. Simple Curved Wave: A gentle curved line that follows the head’s natural shape. Complements wavy and curly hair textures well. Works for square faces by softening angles. Ask for: “a single curved line following the shape of my head at the temple.”
8. Clean Nape Line: A single line placed at the nape instead of the temple. Hidden from front view, visible from behind. Fits any face shape since it’s not visible face-to-face. Ask for: “one clean line at the nape, centered.”
Intermediate Geometric Designs
These need a barber with more razor precision and steadier hands.
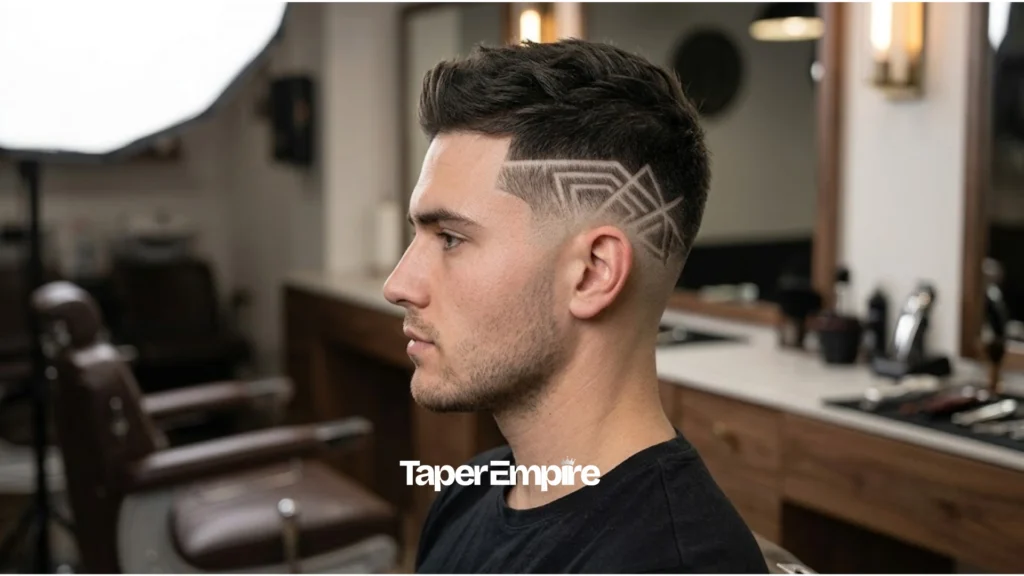
9. Zigzag Lightning Pattern: A jagged zigzag line at the temple or side. Shows best on dark, dense hair. Suits round faces by adding sharp angles. Ask for: “a zigzag pattern at my temple, three to four points.”
10. Diamond Shape at Temple: A small diamond outline shaved into the temple zone. Works on medium-to-coarse hair textures. Best for oval and diamond face shapes wanting an artistic detail. Ask for: “a small diamond shape outlined at my left temple.”
11. Triangle Accent: A triangle shape placed at the side or temple. Reads clearly on straight and coily hair alike. Suits square faces looking for a bold geometric statement. Ask for: “a triangle shape at my temple, pointing upward.”
12. Cross Design: Two intersecting lines forming a cross or plus shape. Visible on most hair types with moderate density. Works for oval and round faces. Ask for: “a cross design centered at my temple.”
13. Starburst at Side: Multiple lines radiating from a central point. Best on coily or thick hair for full visibility. Fits diamond and heart face shapes. Ask for: “a starburst pattern with four to five radiating lines on my side.”
14. Wave Plus Line Combo: A curved wave line paired with a straight accent line. Complements wavy and curly hair textures. Suits square faces by mixing soft and sharp elements. Ask for: “a wave line with one straight accent line beside it at the temple.”
15. Asymmetric Double Line: Two lines set at different angles rather than parallel. Shows well on straight and wavy hair. Works for oval faces wanting a modern, uneven look. Ask for: “two lines at different angles, not parallel, at my temple.”
16. Checkerboard Pattern: A small grid pattern shaved into the side zone. Needs coarse or dense hair for clean visibility. Best for round faces adding structure. Ask for: “a small checkerboard grid on my side, about two inches wide.”
17. Parallel Curves: Multiple curved lines running parallel to each other. Complements curly and coily hair textures. Suits heart-shaped faces. Ask for: “three parallel curved lines at my temple, following the same arc.”
18. Geometric Window: A rectangular or square outline with an inner line detail. Works on medium-to-thick hair. Fits diamond and oval face shapes. Ask for: “a rectangular outline with one line through the center, at my temple.”
Advanced Freestyle Designs
These require a barber who specializes in razor artwork. Ask to see portfolio examples before booking.
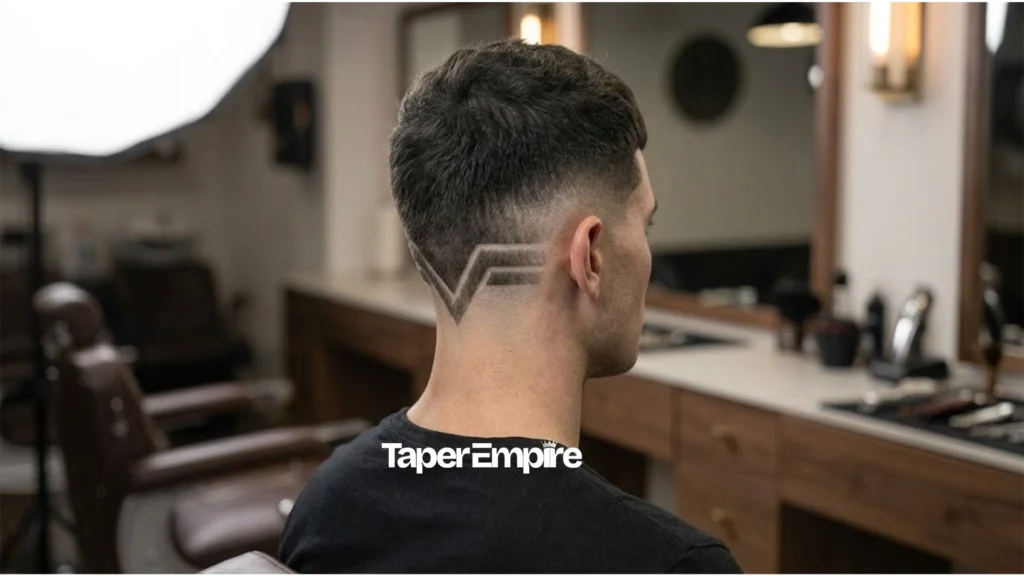
19. Initial or Letter Cut: A personalized letter or initial shaved into the side or nape. Shows best on coily or dark, dense hair. Works for any face shape since placement matters more than face structure. Ask for: “my initial [letter] shaved at the nape, about two inches tall.”
20. Freehand Abstract Curves: Non-repeating curved lines with no fixed pattern. Complements curly and wavy hair for a flowing look. Suits oval and round faces. Ask for: “freehand abstract curves, similar to this reference photo, on my side.”
21. Tribal-Inspired Pattern: Bold, connected geometric shapes covering a larger area. Best on thick, coarse hair for maximum contrast. Works for square and diamond faces. Ask for: “a bold connected geometric pattern like this photo, covering my side.”
22. Burst Fade with Radial Lines: A semicircular burst pattern around the ear combined with radiating lines. Shows clearly on coily and thick hair. Fits most face shapes since it wraps the ear. Ask for: “a burst pattern around my ear with radial lines extending outward.”
23. Nape Mandala: A circular, symmetrical pattern placed at the nape. Needs dense, dark hair for the detail to read clearly. Hidden from front view, works for any face shape. Ask for: “a circular mandala-style design centered at my nape, about three inches wide.”
24. Multi-Element Side Artwork: A combination of lines, shapes, and curves covering the full side panel. Best on coily or coarse hair. Suits square and diamond faces. Ask for: “a full side design combining lines and shapes, similar to this photo.”
25. Custom Symbol: A specific symbol, logo, or shape unique to the client. Shows best on dark, dense hair textures. Works for any face shape. Ask for: “this specific symbol [show image] shaved at my temple or side.”
26. Architectural Geometric Stack: Multiple geometric shapes stacked and connected in a structured pattern. Needs thick, coarse hair for clean visibility. Suits round and oval faces. Ask for: “a stacked geometric pattern combining triangles and lines, at my side.”
27. Flowing Freestyle Wave Art: Multiple curved lines flowing together without repeating symmetry. Complements curly and wavy hair textures. Fits heart and oval face shapes. Ask for: “flowing wave-style artwork, freehand, covering my side panel.”
28. Full Side Panel Design: The most complex option, covering the entire side from temple to nape with a unified pattern. Best on coily or very thick hair. Works for any face shape given the large canvas. Ask for: “a full side panel design like this reference, from temple to nape.”
Best Designs for Your Hair Type
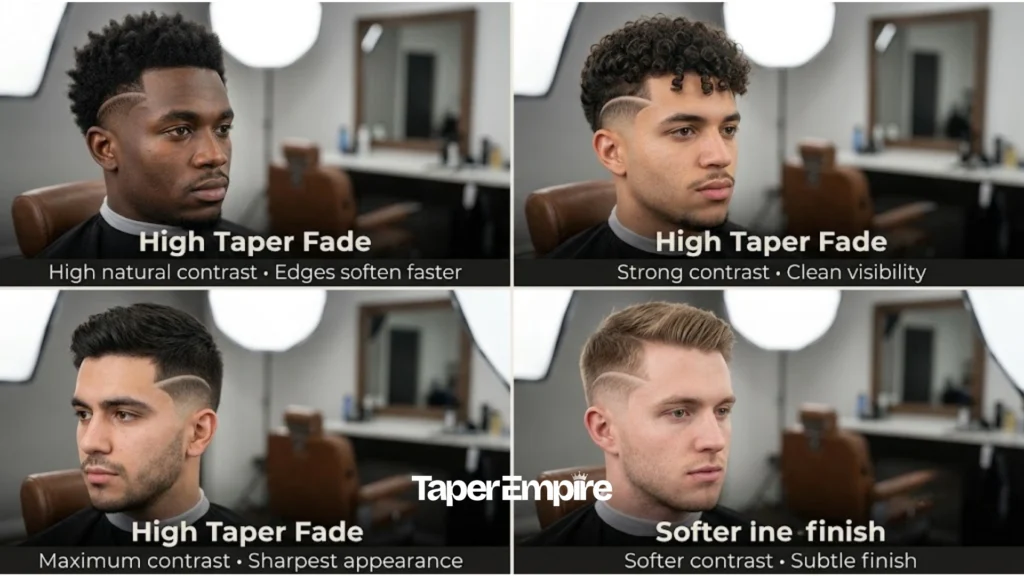
Razor designs rely on contrast between the shaved line and the surrounding hair. That contrast varies with hair texture, density, and the color difference between your hair and skin.
| Hair Type | Contrast Level | Recommended Designs | Line Thickness | Visibility Duration |
|---|---|---|---|---|
| Coily/Kinky (Dark) | Highest | All design types work well | Thin lines show clearly | 5–10 days sharp |
| Curly (Medium-Dark) | High | Geometric shapes, waves | Standard thickness | 7–12 days |
| Straight (Dark) | High | Geometric shapes read clearest | Standard thickness | 7–14 days |
| Straight (Light) | Medium-Low | Bolder, thicker patterns | Double-pass lines needed | 10–14 days |
| Wavy | Medium | Wave-style patterns | Standard thickness | 7–12 days |
| Fine/Sparse | Low | Bold, simple designs only | Bold lines essential | Blurs faster than average |
Coily hair delivers the sharpest contrast because of its density and the strong color difference against most skin tones. Single-line designs stay crisp for 5 to 10 days on this hair type, and barbers can execute intricate geometric patterns with confidence since the design reads clearly from every angle.
Curly hair works with nearly any design, but placement matters. The design needs to sit below where the curls begin, inside the faded zone rather than where texture starts. Ask your barber to take the fade to a very short guard before adding the pattern so the lines stay visible.
Straight, dark hair on medium or light skin creates a strong contrast with geometric shapes. Triangles, diamonds, and zigzags read cleanly because there’s no texture interference from curl pattern. This combination also holds the design longer, often 7 to 14 days before noticeable blur.
Light or blonde straight hair needs bolder choices. A single thin line may lack visibility against lighter skin. Ask for a double-pass line, meaning the barber goes over the shaved area twice for a wider, bolder mark. Simpler patterns also outperform intricate ones on this hair type.
Wavy hair sits between straight and curly for contrast. Wave-pattern designs create a visual echo with the hair’s natural movement on top. Standard line thickness works fine here, and designs typically hold for 7 to 12 days.
Fine or sparse hair presents the biggest challenge. New growth fills in around the shaved lines more quickly, so designs can blur within 5 to 7 days in some cases. If your hair is fine, choose bolder, simpler patterns over intricate freestyle work, or plan on more frequent barbershop visits.
For a broader range of design examples matched to specific hair textures, high taper fade styles built around Black men’s hair textures walk through additional barber scripts for coily and kinky hair types. Readers with straight hair looking for more styling variations can also find product and top-style pairings beyond the design element. The same applies to curly-hair-specific styling guidance, which covers curl-definition methods that complement a design on the sides.
Which Design Suits Your Face Shape?
Face shape determines where visual attention lands on a high-taper fade in design. Placement and the direction of the pattern can either soften or sharpen your natural proportions.
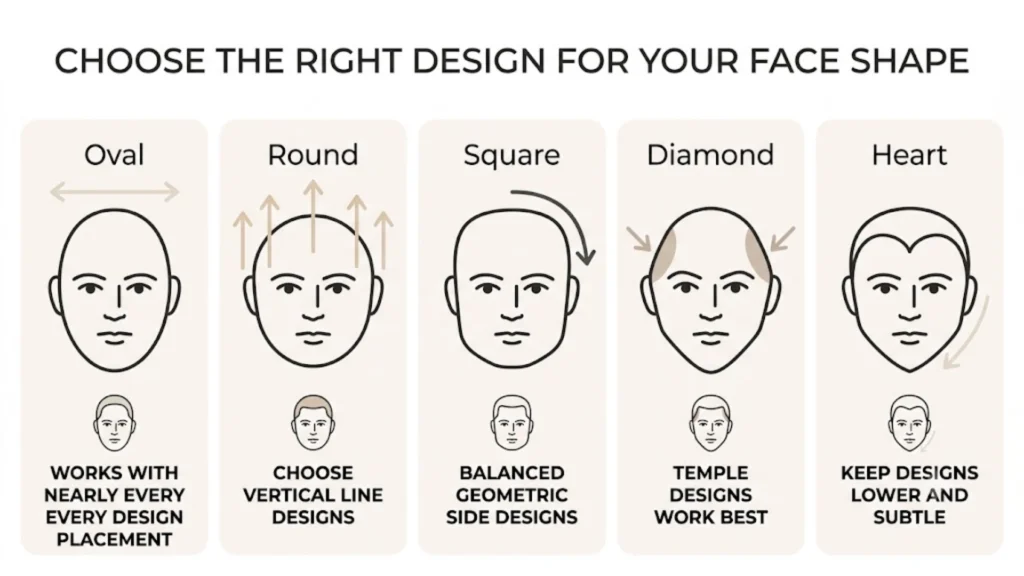
Oval Face: All design types suit oval faces. Both temple and nape placements work equally well. Choose based on personal preference rather than face shape constraints.
Diamond Face: Diamond faces have a narrow forehead and chin with wider cheekbones. Temple designs add width at the forehead, balancing the proportions. Geometric patterns at the temple level work particularly well here.
Round Face: The goal for round faces is adding vertical length and sharper angles. Vertical line designs, such as the angled temple arrow or vertical slashes, create a lengthening effect. Avoid horizontal or curved patterns, which can emphasize roundness instead.
Square Face: Square faces have strong, angular jawlines. Curved wave designs soften that angularity. Bold geometric patterns like triangles and zigzags lean into the boldness instead. Both approaches work depending on whether you want contrast or harmony with your jawline.
Heart Face: Heart faces have a wider forehead and narrower chin. Designs at the temple or side help balance the width of the upper face. Simple line designs work better here than complex patterns, which can add unwanted visual weight up top.
Long or Rectangular Face: Long faces risk over-lengthening when combined with a high taper and temple design. Nape-focused designs work better than temple placements for this face shape. Horizontal or curved patterns are preferable to vertical lines. Some barbers recommend a mid taper rather than a high taper for very long faces, as it reduces vertical emphasis.
How Complex Can Your Design Be?
Not every barber specializes in razor design work. A single-line temple design needs basic fade skills that most experienced barbers have. A freestyle nape artwork needs a specialist. Matching your design ambition to your barber’s actual skill level prevents disappointment.
| Complexity Level | Design Examples | Barber Skill Needed | Added Time | Touch-Up Frequency |
|---|---|---|---|---|
| Simple | Single line, double line, temple arrow | Any experienced fade barber | 5–10 minutes | Every 10–14 days |
| Intermediate | Geometric shapes, wave patterns, crosses | Design-focused barber | 15–20 minutes | Every 7–10 days |
| Advanced | Freestyle curves, initials, multi-element patterns | Master barber or design specialist | 25–40 minutes | Every 5–7 days |
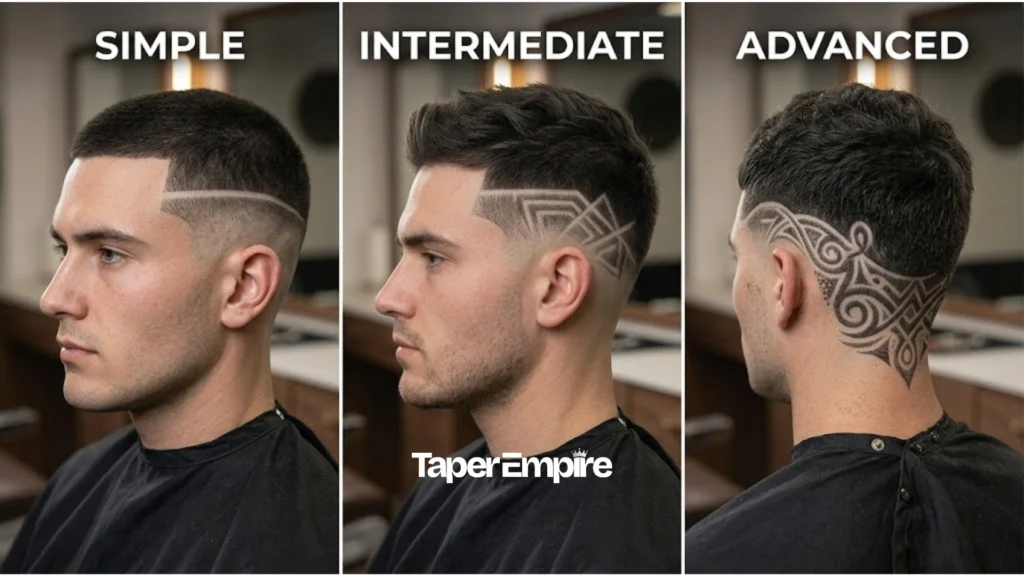
Before committing to a complex design, ask to see photos of your barber’s previous design work. Most barbers who do this regularly post examples on Instagram or keep a portfolio at the shop. If your barber hesitates or suggests simplifying the request, that’s useful information, not a limitation. A poorly executed complex design looks worse than a clean, simple line.
Many barbers who specialize in fades will refer design-heavy requests to a colleague who specializes in that work. This is professional honesty rather than a shortcoming, and it usually leads to a better result than pushing a barber outside their comfort zone.
Complex designs also cost more and take longer. According to industry pricing data from the SQUIRE 2026 State of Barbershops Report, intricate razor work, such as etched patterns or hard parts, typically adds $10–$25 to the base fade price due to the extra precision and chair time required. Advanced patterns typically add extra time to the appointment and often come with a design surcharge on top of the standard haircut price. Maintenance frequency also increases, since advanced designs blur within 5 to 7 days and require weekly touch-ups to stay sharp. Budget both time and money before choosing a high-complexity design.
Where Should the Design Go?
Design placement determines who sees your cut and from which angle. Temple designs make a front-facing statement. Nape designs reveal themselves in behind-the-head or profile shots. Side placements show up in mirror checks and side-angle photos.
| Placement | Visibility | Canvas Size | Best Design Types | Professional Setting Suitability |
|---|---|---|---|---|
| Temple | High, face-to-face | Small (2–3 inches) | Simple lines, small shapes | Medium |
| Side | Medium, profile view | Medium (3–5 inches) | Geometric patterns, waves | Medium |
| Nape | Low daily, high in photos | Large (4–6 inches) | Complex freestyle art | High |
| Bilateral | High, multiple angles | Varies | Matching simple or geometric designs | Low to Medium |
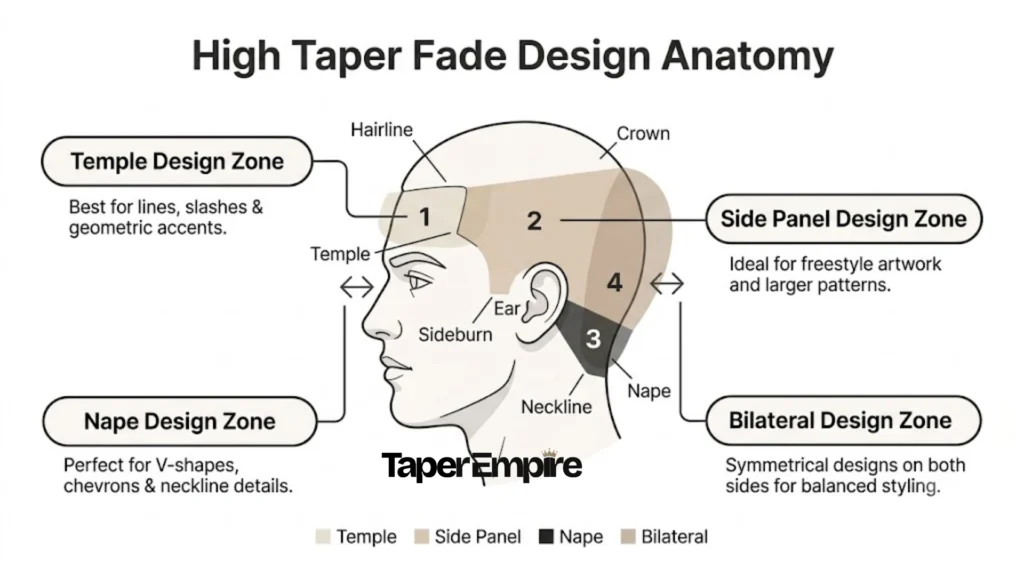
Temple designs get requested most often because they’re visible in everyday conversation and front-facing photos. The small canvas favors simple lines, angled arrows, or small geometric shapes rather than crowded patterns. Because this zone grows out visibly fast, temple designs need touch-ups roughly every 7 to 10 days.
Side designs sit between the ear and the nape. This is the ideal spot for intermediate geometric work, such as zigzags, diamonds, or waves. Side placement shows up in profile shots and barbershop mirror checks but stays subtle in direct face-to-face conversation, making it a middle-ground choice.
Nape designs offer the largest canvas, typically 4 to 6 inches of workable space, making them ideal for complex freestyle artwork, mandalas, or multi-element patterns. This zone remains hidden in most professional, face-to-face contexts, making it the safer choice for conservative workplaces. Barbers can spend real time on nape detail without the size limits of the temple.
Bilateral designs, placed on both sides, double the visual impact but also double the maintenance time and cost. Most clients keep bilateral placements to simple lines rather than complex patterns to keep touch-up appointments manageable. Barbers exploring design placement in the back and side zones for lower fade heights use similar canvas logic, since nape space works the same way regardless of fade height.
How to Tell Your Barber What You Want
Vague requests like “give me a design” leave too much room for interpretation. Barbers need four specific pieces of information: fade height, design type, placement, and complexity level.
Step 1: Show a Reference Photo Bring a clear, zoomed-in photo of the exact design you want. Screenshot it from Instagram, save it from Pinterest, or use a photo from this guide. Say “I want this exact design” and point to the specific element, not the whole haircut.
Step 2: Name the Fade Height Say “high taper fade starting at the temple, faded to skin” or “high taper to a zero guard.” Use “high taper” specifically rather than a generic word like “fade.”
Step 3: Name the Design Type and Placement Use a script matching your design choice:
- For a simple line: “I want a single straight line on my left temple, about an inch above the ear.”
- For geometric work: “I want a zigzag pattern on my side, between the ear and neckline.”
- For freestyle art: “I want a custom curved pattern like this photo on my nape. Can you sketch it first?”
Step 4: Confirm the Top Length and Style Specify the top separately from the sides. Say “leave two inches on top, textured” or “keep length for a slick back.” This stops the barber from focusing only on the design and misreading your overall vision.
Step 5: Ask About Timing and Adjustments Ask “how long will the design take?” and “if the first line doesn’t look right, can we adjust before you finish?” This signals that you’re collaborative rather than rigid, and most barbers appreciate clients who understand design work involves some improvisation.
Common mistake to avoid: never say “just do what you think looks good” right after showing a reference photo. Barbers read that as permission to deviate from what you showed them. If you commit to a photo, stick with it. If you actually want creative input, say so directly: “I like this general style, feel free to adapt the details.”
Before your appointment, check the barber’s Instagram or ask the front desk whether that barber does design work specifically. If your first fade-height decision was mid taper rather than high, barber-approved terminology for mid taper designs uses a similar script structure with back-view examples worth reviewing before your appointment.
Quick Tip
Matching a design to your actual face shape and hair texture takes some guesswork out of this decision. Taper Empire’s free facial structure tool scores styles against your real geometry in under a minute, rather than a general estimate.
How Long Does the Design Last?
A high taper fade holds its shape for about two to three weeks, but the razor design underneath blurs much faster. Depending on complexity, hair growth rate, and hair type, a design typically stays sharp for 5 to 14 days before the surrounding hair grows in enough to reduce the contrast.
| Design Complexity | Sharp Visibility | Blur Begins | Unrecognizable By | Recommended Touch-Up |
|---|---|---|---|---|
| Simple (single/double lines) | 7–10 days | Day 10–12 | Day 14–16 | Every 10–14 days |
| Intermediate (geometric shapes) | 5–7 days | Day 8–10 | Day 12–14 | Every 7–10 days |
| Advanced (freestyle, multi-element) | 3–5 days | Day 6–8 | Day 10–12 | Every 5–7 days |
According to the American Academy of Dermatology, average scalp hair grows roughly half an inch per month, about six inches per year. Individual growth rates vary based on genetics, age, and overall hair health. Coily and curly hair types tend to show design blur slightly faster than straight hair, since new growth carries more texture and disrupts the clean-shaven line sooner. Fine hair can blur a design within 5 to 7 days because there’s less density to maintain contrast.
Between days 10 and 14, when the design starts blurring but the overall fade still looks acceptable, you have two options. A design-only touch-up refreshes just the shaved lines without a full cut, usually taking 10 to 15 minutes. Alternatively, you can let the design fade out completely and return for a full cut with a fresh pattern around week three.
The neckline grows out fastest of all, often showing stubble within 5 to 7 days. Many barbershops offer free or low-cost neckline cleanups between full appointments. Asking your barber directly whether they offer this service keeps the whole look sharp even as the design itself transitions.
Design maintenance is a real-time and cost commitment. If you travel often, work irregular hours, or simply prefer lower-maintenance haircuts, simple line designs with 10 to 14 days of longevity make more sense than complex patterns that need weekly upkeep. For a broader maintenance routine covering home care and product schedules beyond the design element itself, a full taper fade maintenance routine applies the same care principles regardless of fade height.
How to Style This Haircut
Styling a high taper fade with design focuses almost entirely on the top hair. The fade and design don’t need daily styling attention; they hold their shape through professional maintenance rather than home routines.
For a Textured Crop or Short Top, work a dime-sized amount of matte styling clay or texturizing paste through damp hair using your fingers. Tousle for volume or push the front forward for a textured fringe. The result is a natural, low-shine finish with visible separation.
For a Curly Top: Apply curl cream or a light curl-defining gel to soaking-wet hair right after showering. Scrunch upward to encourage curl formation, then air-dry or diffuse on low heat. This defines curls with bounce and controls frizz.
For a Slick Back or Pompadour, apply medium-to-high hold pomade or styling cream to damp hair. Use a comb or your fingers to slick the hair back, or lift the front into a pompadour. Blow-drying with a round brush adds volume before setting the style.
For a Buzz Cut: Top Product is optional here. If you want subtle texture, rub a rice-grain amount of lightweight matte paste between your palms and run it over the top.
The fade and design need no product at all. Keep the faded area clean and use a light scalp moisturizer daily if your skin runs dry, since dry scalp can make a fresh fade look flaky or uneven. Avoid heavy oils on the shaved area, since they attract lint and dull the clean lines of your design.
Wash your hair every 2 to 3 days with a clarifying shampoo to prevent product buildup on top. Buildup weighs hair down and flattens textured styles, but the faded area itself can be rinsed daily without shampoo.
Best Top Styles to Pair With It
The top style you choose determines where visual attention lands on the whole haircut. A high-volume curly top draws the eye upward, which changes how visible your design placement actually is.
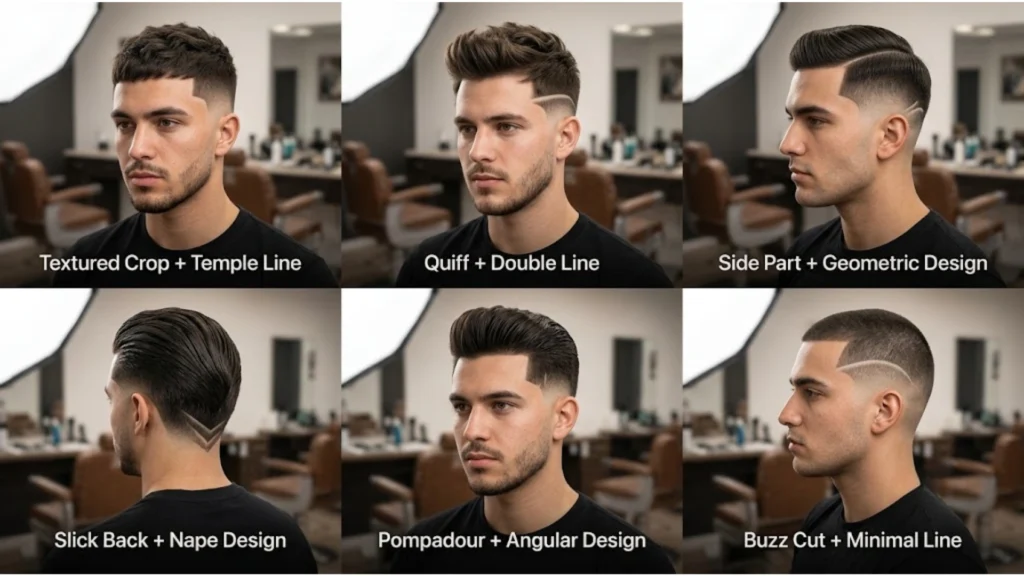
Textured Crop: This has a neutral effect on design visibility. The top is short enough not to overshadow side designs but full enough to balance bolder patterns. Any design type works well here, and both temple and side placements stay equally visible.
Curly Top: High-volume curls draw attention upward and outward, making them the main focal point. Nape designs gain more visibility with a curly top since viewers naturally see the back and sides from multiple angles. If you want the design itself to stand out, choose a side or nape placement rather than the temple.
Slick Back Hair pulled back and flat fully exposes the sides and temple area, making the design the most visible expressive element of the whole cut. Bold temple or side designs work best here since the clean, slicked-back top contrasts sharply with geometric or line work.
Pompadour Volume at the front draws attention upward, but the sides stay visible. Temple and side designs work well, with the pompadour’s height balancing a bold side pattern. Avoid overly complex designs that compete visually with the pompadour’s volume.
Buzz Cut Top: With minimal top length, the fade and design become the only expressive elements of the haircut. Intermediate-to-advanced complexity designs work well here since there’s no top hair competing for attention. Temple, side, and nape placements all work, with complexity mattering more than location.
Faux Hawk or Mohawk: The center ridge dominates this style, making designs a secondary detail. Simple bilateral line designs that frame the ridge work best. Avoid complex patterns that compete with the mohawk’s shape.
Man Bun or Long Top: When hair is tied up, the sides and nape are fully exposed. When hair is down, the design stays hidden. Side and nape placements gain visibility with the hair up, making this a good pairing for switching between professional and casual looks.
Mistakes to Avoid With This Cut
Most design disappointments stem from mismatched expectations, unclear barber communication, or choosing a complexity level that doesn’t align with your actual maintenance commitment. Avoiding these six mistakes increases your odds of walking out satisfied.
1. Choosing a complex design without checking your barber’s portfolio. Not every barber specializes in design work. A general fade barber can execute clean fades but may lack the steady hand freestyle patterns require. Ask to see examples before requesting anything beyond simple lines.
2. Requesting a design without understanding maintenance frequency. Complex designs blur within 5 to 7 days. If you assumed a design lasts as long as the fade itself, day 10 will disappoint you. Ask your barber directly how often you’ll need to return.
3. Saying “do whatever you want” after showing a reference photo. This creates mixed signals. If you show a specific photo, commit to it. If you actually want creative input, say so directly rather than leaving it ambiguous.
4. Choosing a design that doesn’t fit your professional context. Bold bilateral temple designs are highly visible at work. If your industry skews conservative, a nape design or a single subtle temple line fits better than a full side-panel freestyle pattern.
5. Neglecting scalp care between appointments. Dry, flaky scalp makes fades and designs look uneven and poorly maintained. A light daily scalp moisturizer on the faded area helps, and heavy oils are best avoided since they attract lint.
6. Skipping the neckline touch-up. The neckline grows out within 5 to 7 days. A crisp temple design paired with a scruffy neckline reads as neglected rather than intentional. Many shops offer low-cost neckline cleanups between full cuts.
Frequently Asked Questions
What are the names of specific razor designs I can get for a high taper fade?
Common types include single- or double-temple lines, angled arrows, zigzag patterns, diamond or triangle shapes, wave motifs, starburst designs, freestyle abstract curves, and personalized initials. Simple lines are the most requested, while freestyle art and initials need a specialist barber.
How long does a razor design on a high taper fade last before it grows out?
Simple line designs stay sharp for 7 to 10 days and blur by day 14. Geometric patterns blur within 5 to 7 days. Advanced freestyle designs blur within 3 to 5 days. Most clients return for touch-ups every 7 to 14 days.
How do I ask my barber for a specific design?
Use this script: “High taper starting at the temple, faded to skin, with a [design type] on the [placement].” Show a reference photo, point to the exact element you want, and confirm your top length separately.
What design works best for my hair type?
Coily and dark straight hair provide the highest contrast, so all design types show clearly. Light or fine hair needs bolder, thicker lines. Curly hair works with most designs if the pattern sits below the curl boundary in the faded zone.
Where should the design be placed?
Temple designs are front-facing and best suited to simple lines or small shapes. Side designs show up in profile views and suit intermediate patterns. Nape designs offer the largest canvas for complex artwork and stay hidden in professional settings.
How much more does a design add to the cost of a high taper fade?
According to Booksy marketplace data and a pricing survey by Shaving Grace AZ, design work typically adds an upcharge on top of the standard haircut price. Simple line designs may add $10–$15, while more complex freestyle patterns can run $15–$25 extra. Pricing varies by city, shop reputation, and barber experience, so it’s worth asking before your appointment begins.
Key Takeaways
A high taper fade with design gives you control over exactly how bold or subtle your haircut looks. Simple lines cost less, last longer between touch-ups, and work with any barber who has solid fade experience. Freestyle patterns demand a specialist, more frequent maintenance, and a bigger budget, but they deliver the most personalized result.
Match your design complexity to your hair type, your face shape, and how often you’re realistically willing to visit the barbershop. Bring a reference photo, use the exact scripts in this guide, and confirm your barber’s design portfolio before committing to anything beyond a single clean line.
Quick Tip:
If you’re still deciding between fade heights or design placements based on your actual face shape, Taper Empire’s free tool reads your facial structure in under a minute and matches it against real geometry rather than a general guess.