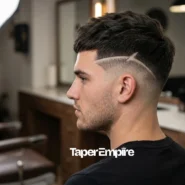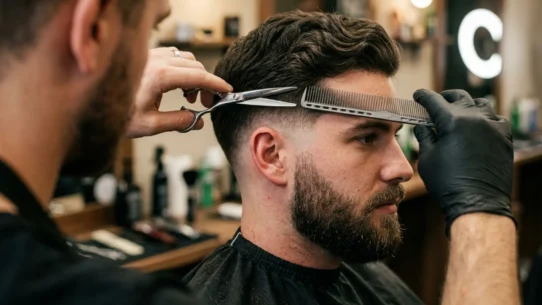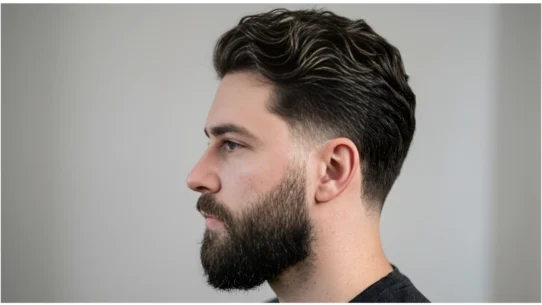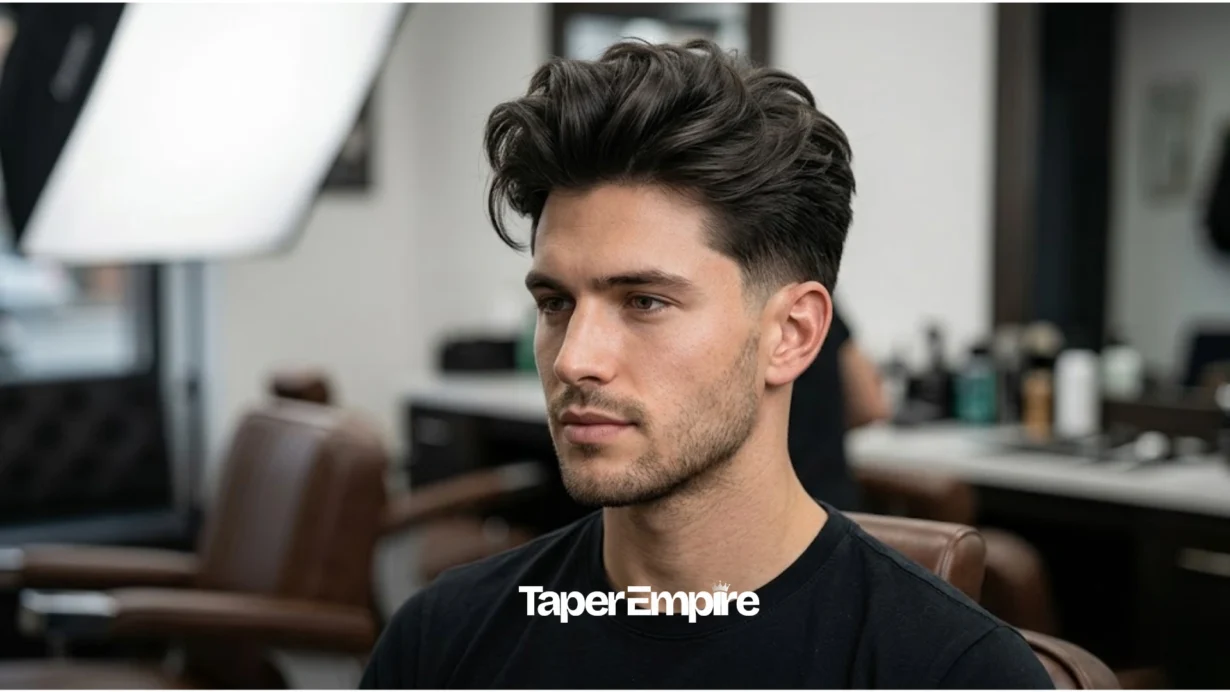

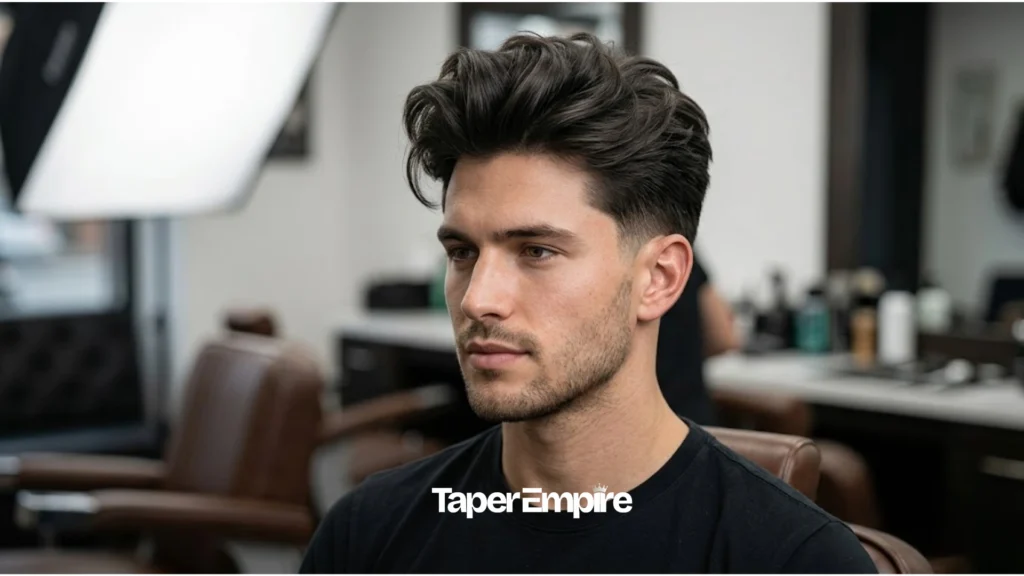
A blowout taper is a men’s haircut combining clean, gradual edges with voluminous, styled-upward hair on top. Unlike a fade, which creates sharp contrast, a taper softens naturally as it grows. This guide covers five distinct variants, how to choose based on your hair type and face shape, exact barber scripts, styling techniques, and maintenance expectations. Whether you’re deciding if this cut is right for you or ready to book an appointment, this article answers every question you’ll face.
What Is a Blowout Taper Haircut, and Who Should Get It?
A blowout taper is a men’s haircut with a clean, gradual taper on the sides and neckline and a voluminous top styled upward and outward. The top retains 2–5 centimeters of length for volume styling. It works on straight, wavy, and curly hair and suits most face shapes when paired with the right taper height.
- Clean edges with a soft, natural grow-out
- Requires daily blow-drying on straight hair
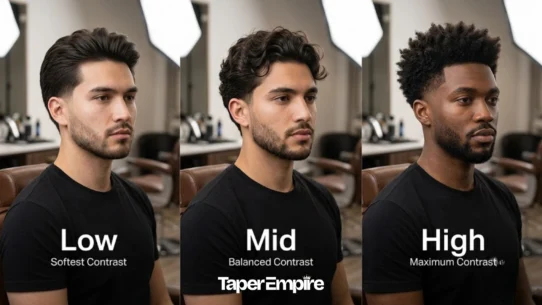
- Taper heights include low, mid, and high
- Low tapers grow out cleanly, while high tapers need 2-week touch-ups
Table of Contents
What Is a Blowout Taper? The Two-Part Haircut Explained
A blowout taper combines two distinct elements: a clean, gradually tapered fade on the sides and neckline, plus a voluminous top left longer and styled upward or outward. The taper creates sharp edges; the blowout creates lift and shape.
The defining feature is length retention on top. While a standard taper simply means shorter sides, a blowout taper requires 2–5 centimeters (0.8–2.0 inches) of hair on top to actually blow out and style. Below 2 inches, there’s nothing to lift. The taper itself fades from approximately 1 centimeter at the hairline up toward the top, creating a smooth transition rather than the harder line of a fade.
Why “blowout” matters: The blowout element distinguishes this from a regular taper haircut. A regular taper is just a shape with graduated length, with no particular styling requirement. A blowout taper demands blow-drying to realize the style. Without the blow-dry, it just looks like a medium-length cut with short sides.
Blowout Taper vs. Other Cuts
| Cut Type | Taper Height | Edge Sharpness | Grow-Out Pattern | Maintenance Frequency |
|---|---|---|---|---|
| Blowout Taper | Low to high (you choose) | Clean, defined | Soft, natural blend | 2–4 weeks full cut; optional 2-week touch-ups |
| Low Taper Fade | Low | Crisp, dramatic | Harder line as it grows | 3–4 weeks full cut |
| Skin Fade | High; fades to skin at bottom | Very sharp | Visible regrowth by week 1 | 1–2 week touch-ups required |
| Fade | Variable | More contrast than taper | Noticeable regrowth line | 2–3 week touch-ups typical |
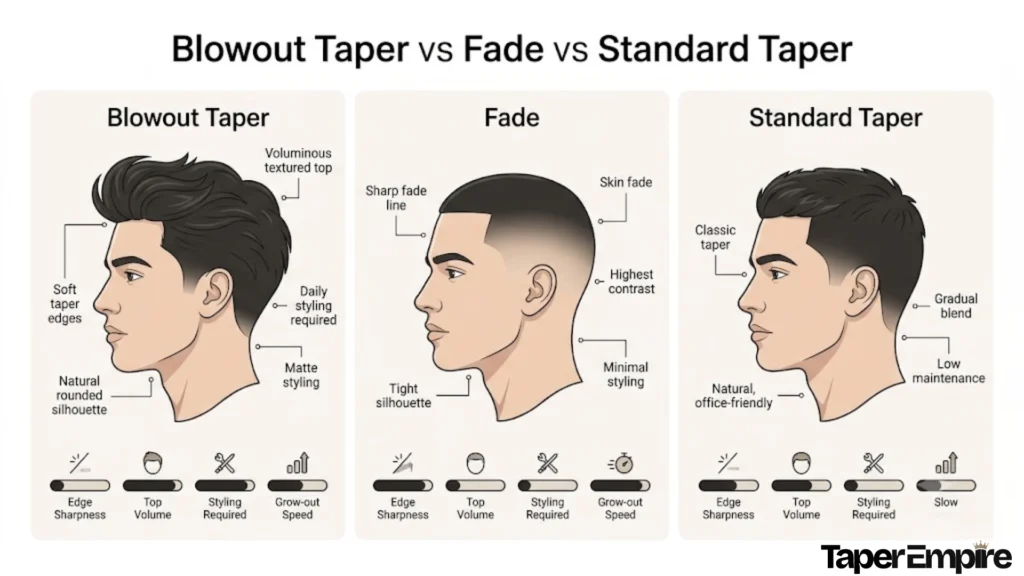
Key distinction: A fade blends much higher up the head with more skin exposure. A taper keeps more hair and creates a softer edge. Blowout taper edges soften naturally by week 2–3; fade edges stay defined longer but require more frequent touch-ups to maintain sharpness.
Historical Context
The blowout taper emerged in Brooklyn during the late 1990s and early 2000s as a variation of the bald fade, gaining popularity among young urban men seeking a style that balanced volume with professional edges. It gained renewed cultural prominence in 2024 through social media trends and references in internet meme culture, but the core technique has remained consistent for over two decades.
The 5 Main Blowout Taper Styles: Low, Mid, High, Textured Fringe & Beyond
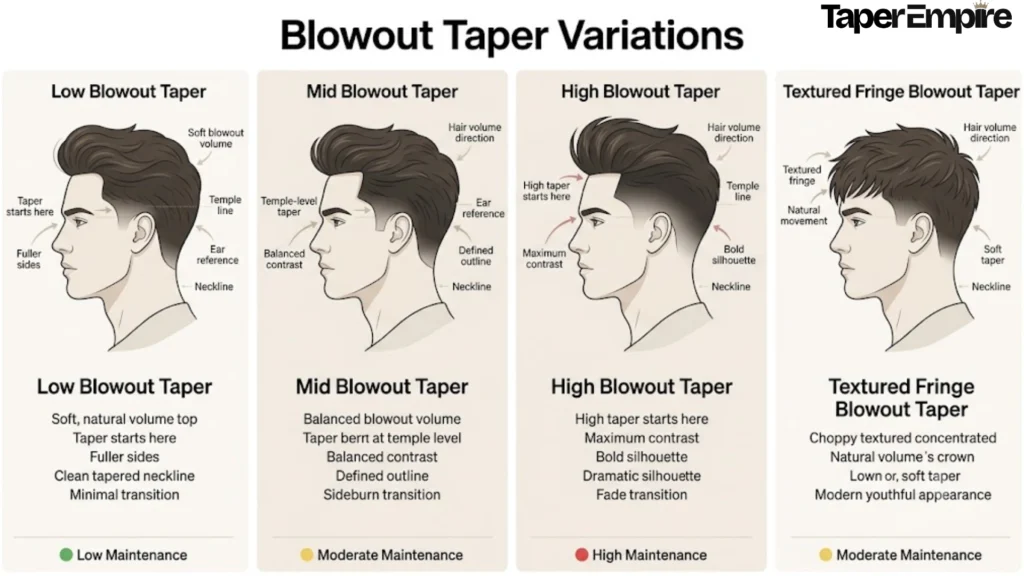
Blowout taper variants differ primarily in where the taper begins on the side of the head and how much contrast they create. Each suits different lifestyles, maintenance tolerances, and personal style preferences.
Low Blowout Taper: The Easiest Entry Point
The low blowout taper starts just above the ears and softens gradually toward the top. It’s the subtlest of the three main heights and offers the softest, most natural grow-out pattern.
Best for: First-timers, conservative looks, professional settings, low-maintenance preference, guys who dislike frequent haircuts.
Grow-out pattern: Edges soften within 1–2 weeks; the taper remains acceptable through week 3–4 as regrowth blends naturally. This is the primary advantage of low taper: soft regrowth hides the regrowth line better than high tapers.
Barber script: “Low blowout taper. Keep it clean around the ears and neckline, but don’t take the sides too high. Leave length on top for volume.”
Styling effort: Low to medium. Blow-drying enhances the style but isn’t mandatory for acceptable appearance.
Maintenance: 3–4 weeks for full cut; optional touch-up at 3 weeks if edges bother you.
Image reference: Side profile showing taper starting just above the ear; fuller sides; defined neckline.
Mid Blowout Taper: The Balanced Sweet Spot
The mid-blowout taper starts around the temple area, creating a more noticeable taper line than low but less dramatic than high. It’s the “most requested” variant because it balances fresh appearance with manageable maintenance.
Best for: Most guys; balanced aesthetic seekers; guys wanting a clearly intentional haircut without extreme commitment.
Grow-out pattern: Edges remain crisp through week 1; visible softening by week 2; still acceptable through week 3; blend-out occurs by week 4.
Barber script: “Mid-blowout taper with texture on top. I want volume, but I still want it clean and blended, not boxy.”
Styling effort: Medium. Blow-dry is recommended for full effect; air-drying is acceptable but less impressive.
Maintenance: 2–3 weeks for touch-up (edges); 3–4 weeks for full cut.
Image reference: 3/4 view showing temple-level taper; textured top; defined but not extreme outline.
High Blowout Taper: The Bold Statement
The high blowout taper begins near the crown area, creating maximum contrast between short sides and full top. This is the most striking variant and requires the most styling commitment.
Best for: Trend-forward guys; thick-haired guys who carry volume naturally; barber skill enthusiasts; guys comfortable with 2-week maintenance schedules.
Grow-out pattern: Edges remain crisp for 7–10 days; visible softening by week 1–2; noticeable regrowth by week 3; requires touch-up to maintain sharpness.
Barber script: “High blowout taper, but keep the transition smooth. I want volume up top and a clean outline no harsh shelf.”
Common pitfall: High tapers can look choppy or unblended if the barber cuts too high or doesn’t shape the top to balance the sides. Precision is critical.
Styling effort: Medium to high. Blow-dry is essential; without it, the high taper looks unkempt or unintentional.
Maintenance: 10–14-day touch-ups are critical for sharpness; full cut every 3–4 weeks.
Image reference: Side profile showing high fade line; bold top volume; dramatic contrast.
Textured Fringe Blowout Taper: The Viral TikTok Version
The textured fringe blowout taper pairs a low or mid taper with a choppy (not blunt) fringe at the front. The fringe is piecey, messy, and natural-looking never a straight line. This is the variant trending most visibly on social media as of 2024.
Best for: Straight or wavy hair; effortless-but-intentional aesthetic; young men; guys who want a trendy, modern look.
Styling: Blow-dry fringe forward or slightly upward; use texture powder for grip on damp hair.
Barber script: “Blowout taper with textured fringe. Keep the fringe choppy and natural no straight bowl line. Leave enough length to blow-dry it up and forward.”
Trend context: This variant dominates Instagram and TikTok as of mid-2024, making it the visible “standard” for younger audiences discovering the blowout taper.
Image reference: Front and side view showing choppy fringe; lifted crown; textured appearance.
Blowout Taper Perm or Curly Variant: For Natural Curl
Pairing a clean taper with permed or naturally curly hair creates soft coils and full volume on top. The fade sharpens the contrast, making coil texture pop.
Best for: Curly or coily hair; defined texture seekers; bold aesthetic.
Styling: Diffuser blow-dry (optional; curls air-dry well) plus curl cream or mousse for hold. Use an afro pick to shape.
Barber script: “Low or mid blowout taper with curls on top. Keep the shape tight, clean edges, and don’t take the sides too high.”
Maintenance: 2–3 week touch-ups; curl definition softens by week 3.
Image reference: Top-down or 3/4 view showing defined curls; tapered sides; clean edge definition.
Variant Comparison Table
| Variant | Taper Height | Maintenance Frequency | Grow-Out Quality | Best For | Styling Effort |
|---|---|---|---|---|---|
| Low | Just above ear | 3–4 weeks acceptable | Soft, natural | First-timers; conservative; professional | Low–Medium |
| Mid | Temple area | 2–3 weeks ideal | Visible softening | Most guys; balanced | Medium |
| High | Near crown | 10–14 days critical | Visible regrowth | Bold look; thick hair | Medium–High |
| Textured Fringe | Low/Mid | 2–3 weeks | Piecey softens naturally | Straight/wavy; trendy; young men | Medium |
| Perm/Curly | Low/Mid | 2–3 weeks + curl care | Curl definition softens | Curly/coily hair; bold | Medium |
Does a Blowout Taper Work for My Hair? A Guide by Hair Type
The blowout taper works on all hair types, but how you achieve and maintain the style varies significantly. Straight hair demands the most intervention; curly and wavy hair carry the style naturally.
Straight Hair: This Requires the Most Styling Effort
Straight hair has no natural texture or wave to hold volume. Without intentional intervention, straight hair lays flat. This is why straight-haired guys often report their blowout taper “looked amazing day 1, then fell flat by day 5.”
The challenge: Straight hair collapses without structure.
The solution: Texture must be cut into the top during the haircut itself. Your barber should use scissor-over-comb or point-cutting techniques to create choppy, textured layers not blunt ends. This built-in texture gives the blow-dryer something to grip.
Blow-dry technique:
- Towel-dry until damp (not soaking)
- Apply heat protectant spray
- Use a round brush or your fingers to blow-dry upward, focusing on the roots first
- Direct airflow upward to create lift
- Apply matte paste or texture powder (pea-sized amount)
- Piece out ends with fingers
- Finish with cool air to lock the shape
Product essentials: Matte paste or texture powder. Avoid heavy pomades they collapse the exact volume you’re trying to create.
Styling time: 5–8 minutes daily.
Minimum length on top: 2–3 inches. Under 2 inches and there’s nothing to lift.
Honest assessment: Straight hair is the most styling-dependent variant. If you won’t blow-dry every morning, consider a lower-maintenance cut.
Common problem: “It collapses by noon.”
- Cause: Too much product or product too heavy; wrong product type.
- Solution: Reduce product amount to half a pea-size; switch to lightweight paste or powder.
Wavy Hair: The Goldilocks Texture
Wavy hair has natural movement that provides automatic lift. No blow-dry is mandatory, though blow-drying enhances the style. This is the easiest hair type for a blowout taper.
Advantage: Natural wave carries the style without daily styling effort.
Blow-dry technique (optional):
- Towel-dry until damp
- Apply sea salt spray or light styling cream
- Use fingers (not round brush) to lightly shape while blow-drying
- Scrunch texture with fingers to enhance waves
- Optional: light cool air finish
Product essentials: Light cream, sea salt spray, or mousse. Avoid heavy paste—it weighs down the wave.
Styling time: 2–4 minutes (or skip entirely; waves air-dry well).
Growth pattern: Waves hide regrowth naturally; soft edges blend well.
Honest assessment: Wavy hair is the lowest-effort option. You can skip styling on lazy mornings and still look intentional.
Curly Hair: Maximize Natural Volume
Curly hair gives you natural height and volume. The taper adds clean edges to define the shape. Your job is preserving curl definition while preventing frizz.
Advantage: Curls carry the style; you’re not fighting flatness like straight hair.
Challenge: Frizz control; maintaining curl definition.
Blow-dry technique (with diffuser):
- Towel-dry gently (don’t rub; squeeze only)
- Apply curl cream or leave-in conditioner from mid-lengths to ends
- Attach diffuser to blow-dryer
- Cup diffuser to hair and scrunch upward; hold 5–10 seconds per section
- Blow-dry 70–80% dry (don’t over-dry; causes frizz)
- Optional: scrunch with microfiber towel to set curls
- Finish with cool air
Product essentials: Curl cream or leave-in conditioner (essential for moisture and frizz control). Light gel optional for additional hold.
Styling time: 5–7 minutes.
Maintenance detail: Curls need refreshing between washes; quick diffuser blast or spray-and-scrunch method works.
Common problem: “It’s frizzy.”
- Cause: Over-drying; insufficient leave-in product.
- Solution: Stop blow-drying at 80% dry and let air-dry the rest. Increase leave-in conditioner amount.
Afro/Coily Hair: The Confidence Cut
Afro hair’s natural coil pattern is an asset, not a limitation. The taper sharpens contrast and highlights texture. Styling is less demanding than straight hair.
Advantage: Natural coils give volume; taper adds definition.
Approach: Clean fade sharpens the contrast; clean edges highlight the texture.
Styling technique:
- Condition and detangle with a wide-toothed comb
- Apply mousse or curl cream for moisture and light hold
- Use an afro pick to lift and shape hair
- Define edges with comb or edge brush
- Optional: light gel on edges for edge definition
- Optional: light blow-dry with diffuser on low speed while picking (most Afro hair air-dries well)
Product essentials: Leave-in conditioner (essential for moisture); mousse or curl cream for light hold; edge gel optional.
Styling time: 3–5 minutes.
Advantage over straight/wavy: Styling is less burdensome. Coils carry the cut naturally; you’re mostly maintaining edges and managing moisture.
Honest assessment: Afro hair is naturally suited to this cut. Less styling burden than straight hair; more defined result than wavy hair.
Hair-Type Styling Comparison Table
| Hair Type | Natural Advantage | Key Challenge | Essential Product | Blow-Dry Technique | Daily Time | Minimum Top Length |
|---|---|---|---|---|---|---|
| Straight | None | Flatness; no natural grip | Matte paste/Powder | Round brush upward | 5–8 min | 2–3 inches |
| Wavy | Automatic wave | Frizz if over-dried | Sea salt spray/Light cream | Fingers optional | 2–4 min | 2 inches |
| Curly | Natural volume | Frizz; curl definition | Curl cream/Leave-in | Diffuser scrunching | 5–7 min | 1.5–2 inches |
| Afro | Bold coil pattern | Moisture; detangling | Mousse/Curl cream | Afro pick shaping | 3–5 min | 1–1.5 inches |
Which Taper Height Works Best for Your Face Shape? A Decision Framework
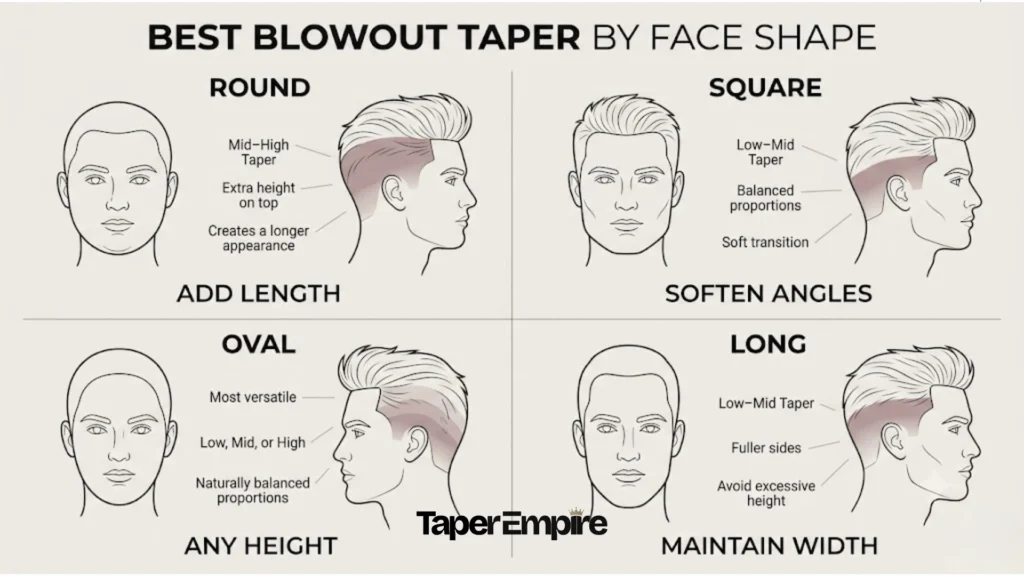
Your face shape influences which taper height flatters you most. Volume on top elongates; taper on the sides defines. Understanding how each works with your face shape removes guesswork from the decision.
Round Faces: Go Mid or High to Add Vertical Length
Round faces are wider than they are tall. The goal is adding vertical dimension to counterbalance width.
Recommendation: Mid or high blowout taper.
Why: Extra height on top creates visual elongation. High taper at the temples adds sharpness to the sides, which defines the face rather than emphasizing width.
What to avoid: Low taper with fuller sides amplifies roundness instead of lengthening it.
Top styling: Lift and volume should go forward and upward—not flat to the back, which widens the face further.
Barber script: “Mid or high blowout taper. I want the top styled up and forward for length, not flat back. Keep the sides tapered so the cut adds length, not width.”
Square Faces: Low or Mid Taper with Soft Texture
Square faces have a strong jawline and angular features. The goal is softening sharpness without fighting it.
Recommendation: Low or mid blowout taper with textured top.
Why: Strong jaw is already prominent; a high taper’s drama competes with your jaw rather than complementing it. Textured, messy fringe softens angularity. Soft texture breaks up sharpness.
What to avoid: High taper with blunt top (looks too angular; amplifies squareness).
Top styling: Textured, messy fringe preferred; avoids adding to facial angularity.
Barber script: “Low or mid blowout taper with texture on top. I want the fringe soft and textured don’t go too high on the sides. I’m trying to balance a strong jaw.”
Beard note: A short beard complements this and adds softness.
Oval Faces: Any Height Works; Pick by Maintenance
Oval faces are naturally balanced. Every taper height works; the choice depends on your lifestyle and maintenance tolerance.
Recommendation: Any variant (low, mid, or high).
Why: Oval is the most balanced face shape. No correction is needed. Choose based on:
- Low: 3–4 weeks; conservative look
- Mid: 2–3 weeks; balanced, fresh appearance
- High: 10–14-day touch-ups; bold, high-maintenance statement
Top styling: Any approach works up, forward, side-swept.
Barber script: “I have an oval face, so any taper height works. What I really care about is [low maintenance / fresh look / bold style]. Let’s pick the height that matches that.”
Honest note: If you’re unsure what you want, mid is the safe default for oval faces.
Long Faces: Stay Low or Mid; Keep Some Width
Long faces are taller than they are wide. The goal is avoiding adding vertical length.
Recommendation: Low or mid blowout taper (not high).
Why: Extra volume on top from a high taper increases vertical proportion. On an already-long face, this tips the silhouette too far toward vertical.
Strategy: Keep some width at the sides; don’t taper too tight.
What to avoid: High taper + tall volume (exaggerates length).
Top styling: Full volume is fine, but focus on horizontal styling (side-sweep) rather than vertical (straight up).
Barber script: Low or mid blowout taper. I have a longer face, so I don’t want to add height on top. Keep the top full but not too vertical, maybe a side sweep?
Quick Tip:
If you’re torn between two heights, our decision tool asks 4 quick questions about your hair type, face shape, and maintenance tolerance, then confirms your ideal variant with a visual recommendation.
What to Tell Your Barber: 5 Blowout Taper Scripts by Height & Hair Type
Communication is where most blowout taper failures happen. A clear script prevents misunderstandings.
Essential Communication Elements
Element 1: Variant name. Always lead with the height first (low/mid/high/textured fringe). This prevents your barber from defaulting to their personal preference.
Element 2: Edge instructions. Tell them where the taper should stay clean and where to keep fullness.
Element 3: Length on top. Specify that you want length left for volume—not a short, all-over cut.
Element 4: Blending. If you care about smooth transitions, say “keep it clean and blended—not boxy.”
Barber Scripts by Variant
| Variant | Primary Script | Alternative Script (If Barber Seems Unsure) | What NOT to Say |
|---|---|---|---|
| Low Blowout Taper | “Low blowout taper. Keep it clean around the ears and neckline, but don’t take the sides too high. Leave length on top for volume.” | “I want the softest version. Clean up the ears and neck, but keep the sides fuller than a fade. Leave about 2–3 inches on top.” | “Just a regular taper” (signals wrong intent; barber thinks standard taper, not blowout) |
| Mid Blowout Taper | “Mid blowout taper with texture on top. I want volume, but I still want it clean and blended, not boxy.” | “Start the fade around the temples. Leave the top full and textured so I can style it with grip. Make sure the sides blend smoothly.” | “Something in between” (vague; barber guesses height) |
| High Blowout Taper | “High blowout taper, but keep the transition smooth. I want volume up top and a clean outline, no harsh shelf.” | “Take the fade pretty high up on the sides, but don’t make it look chopped off. Keep the top full and shaped.” | “Just go high” (risks unblended, choppy result) |
| Textured Fringe | “Blowout taper with textured fringe. Keep the fringe choppy and natural, with no straight bowl line. Leave enough length to blow-dry it up and forward.” | “Low or mid taper with a messy fringe. The front should be piecey, not one blunt line. I want to be able to style it up and forward.” | “Give me a fringe” (doesn’t signal textured/choppy; barber may cut blunt fringe) |
| Curly/Coily Hair | “Low blowout taper with curls on top. Keep the shape tight, clean edges, and don’t take the sides too high. I want the curls defined.” | “Clean low taper, but leave the curls on top. I’m using [curl cream/mousse], so shape it in a way that works with natural curl.” | “Just taper it” (barber misses curl-specific needs) |
Reference Photo Guidance
Photo #1: Front or 3/4 view of the top.
- Shows what style/texture/length you want
- Example: Textured fringe showing piecey, forward-facing look
- Source: Instagram barber portfolios are better than blurry TikToks
Photo #2: Side or back view of the taper height.
- Shows exactly where the fade starts
- Example: Side profile showing temple-level taper (for mid)
- Source: Real barber results (not model photos)
Best practice: Bring 2 photos. One shows the top; one shows the taper height. Barbers respect visual references more than descriptions.
Honest tip: “A picture of a ‘textured fringe blowout taper’ saves 5 minutes of confusion. Use barber portfolio photos from your area if possible.”
Optional Clipper Guard Reference
If your barber uses clipper numbers, here’s what they mean:
- Low blowout taper: #0.5–#1.5 on sides; #3–#4 on top (for texture)
- Mid blowout taper: #1–#2 on sides; #4–#5 on top
- High blowout taper: #1.5–#2 on sides; #5+ on top
Honest note: Most barbers prefer descriptive language (low/mid/high) over numbers. Numbers are a backup if you’re both comfortable with them. Don’t lead with clipper guards; it often confuses the conversation.
What NOT to Say
- ❌ “Just give me a blowout.” (Barber thinks salon blow-dry service, not haircut style.)
- ❌ “Something fresh.” (Too vague; barber guesses.)
- ❌ “A fade.” (Fade ≠ taper; you’ll get the wrong cut.)
- ❌ “I saw it on TikTok.” (Barber has seen 1,000 TikToks; be specific.)
- ❌ “Make me look like [celebrity].” (Risky; barber may not know who you mean or whether it suits your face.)
What makes a great conversation:
- ✓ Name the variant (low/mid/high) FIRST
- ✓ Bring 2 photos showing taper height AND top style separately
- ✓ End with: “What do you think will work best for my [hair type/face shape]?”
How to Style a Blowout Taper at Home: Step-by-Step Blow-Dry Guide
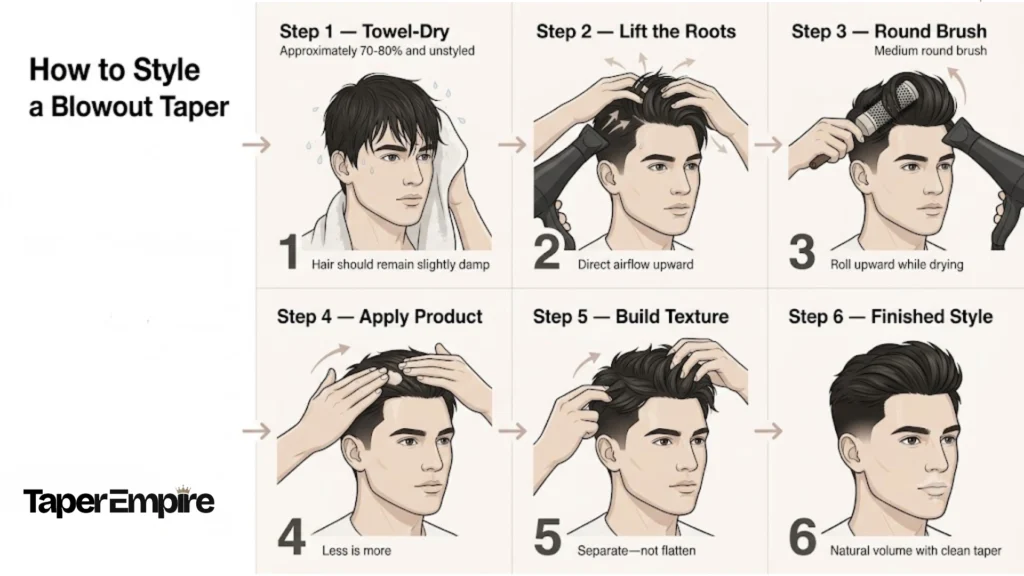
The blowout taper cut is only half the style. The blow-dry technique is the other half. Without it, even a perfectly cut blowout taper reads as a medium-length cut with short sides, not an intentional style.
General Blow-Dry Principles (All Hair Types)
Start with damp hair, not soaking wet. Towel-dry until the hair drips slightly but isn’t saturated. Soaking wet hair takes too long to dry and loses shape easily.
Apply heat protectant spray. A light mist on roots and lengths. Heat protectant creates a barrier that slows heat conduction and distributes heat more evenly across the hair, significantly reducing thermal damage. Research on common heat-protectant ingredients has shown damage reduction ranging from roughly 10–50%, depending on the formulation and concentration though no product can eliminate heat damage entirely.
Lift at the roots first. Direction matters more than speed. Blow-dry upward, using your fingers or a round brush to cup the scalp and push hair upward. Lifting roots first establishes the foundation for the entire style.
Finish with cool air. A 10-second blast of cool air locks the shape for 2–3 hours. This is non-negotiable for style longevity.
Straight Hair: 5-Step Blow-Dry for Maximum Lift
Straight hair is the most styling-dependent. Here’s the exact process:
Step 1: Rough-dry the top upward. No brush; use only fingers. Lift roots by cupping hands at the scalp and pushing upward. Let air-dry 50% before moving to the next step.
Step 2: Use a round brush to shape. Starting at the crown, blow-dry upward and slightly back using a round brush to curl the ends. Work section by section, moving from crown to front to sides.
Step 3: Apply matte paste. Pea-sized amount in palms. Work through lengths and roots. Avoid the scalp (looks greasy).
Step 4: Piece out the ends. Use fingers to separate and define texture. Direction should be upward/forward.
Step 5: Cool-air finish: A 10-second blast of cool air locks the shape.
Time commitment: 6–8 minutes daily.
Product essentials: Matte paste (not heavy pomade). Light spray-on texture powder for flat-day rescue.
Troubleshooting:
- Collapses by noon: Product too heavy or too much. Reduce to half a pea-size; switch to lightweight paste or powder.
- Too poofy: Sides not compressed while blow-drying. Use round brush on sides to keep them defined; compress slightly to maintain structure.
Wavy Hair: 2-Minute Blow-Dry (or Skip It)
Wavy hair air-dries well. Blow-dry enhances but isn’t mandatory.
Step 1: Towel-dry to damp. Gently squeeze; don’t rub. Natural waves should be partially dry.
Step 2: Apply sea salt spray or light cream. Light mist on lengths. Enhances wave definition.
Step 3: Optional blow-dry. Use fingers (not a brush) and blow cool-to-warm air while scrunching upward. Or skip this step; waves air-dry beautifully.
Step 4: Scrunch with fingers. Shape by scrunching upward to enhance waves.
Step 5: Light product (optional). Use a small amount of light cream or mousse if needed. Most wavy hair doesn’t require product.
Time commitment: 2–4 minutes (or skip entirely).
Advantage: “Wavy hair is the easiest. Blow-dry is optional. You can skip it on lazy mornings and still look intentional.”
Curly Hair: Diffuser Technique to Preserve Definition
Curly hair needs careful handling to preserve curl definition while preventing frizz.
Step 1: Towel-dry gently. Gently squeeze curls; don’t rub. Avoid towel friction (causes frizz). Microfiber towel preferred.
Step 2: Apply curl cream or leave-in Generously on mid-lengths to ends. Avoid scalp. Coat each curl.
Step 3: Apply optional light gel. If using, work into curls gently. Avoid crunching (hardens curls).
Step 4: Diffuser blow-dry. Attach the diffuser to the blow-dryer. Cup the diffuser to hair and scrunch upward; hold 5–10 seconds per section. Move through sections methodically. Blow-dry 70–80% dry; stop before completely dry to prevent over-drying.
Step 5: Optional plopping. After blow-dry, scrunch with a T-shirt or microfiber towel for 10 seconds to define curls.
Step 6: Cool finish: Brief cool air blast.
Step 7: Optional redefine: Use a pick or fingers to gently separate curls if needed.
Time commitment: 5–7 minutes.
Product essentials: Curl cream (essential) or leave-in conditioner. Light gel optional.
Troubleshooting:
- Frizzy: Over-drying. Stop at 80% dry and let the rest air-dry. Increase leave-in conditioner.
- Undefined curls: Not enough product. Increase curl cream amount or add light gel.
Afro/Coily Hair: Pick & Mousse Method
Afro hair styling is mostly about shaping and edge definition, not blow-drying.
Step 1: Condition and detangle. Apply leave-in conditioner. Use a wide-toothed comb to detangle gently from ends upward.
Step 2: Apply mousse or cream. Work through coils for moisture and light hold. Build from roots to ends.
Step 3: Use an afro pick to shape. Start at sides; lift and pick upward to define shape. Work in sections methodically.
Step 4: Define edges. Use a comb or edge brush to define the hairline and neckline. Optional: light gel on edges.
Step 5: Optional light blow-dry. If using, use a diffuser on low speed while picking/shaping. Most Afro hair air-dries well without blow-dry.
Time commitment: 3–5 minutes.
Product essentials: Leave-in conditioner (essential for moisture). Mousse or curl cream for light hold. Edge gel optional.
Advantage: “Afro hair is naturally high-volume. Styling is mostly about edge definition and frizz control. Less effort than straight hair.”
Styling Troubleshooting Reference
| Problem | Cause | Solution |
|---|---|---|
| Collapses by noon | Too much product or product that is too heavy | Reduce product amount to half pea-size; switch to powder or lightweight paste |
| Too poofy | Not compressing sides while blow-drying | Use round brush on sides to keep defined; compress slightly |
| Frizzy | Over-drying; not enough leave-in product | Stop blow-dry at 80% dry; increase curl cream or leave-in |
| No volume/flat | Not enough length; not lifting roots | Ensure 2+ inches on top; blow-dry upward at roots first |
| Falls apart after styling | Not using cool air finish | Always finish with 10-second cool air blast to set shape |
How Long Does a Blowout Taper Stay Fresh? The 4-Week Timeline
Understanding the 4-week maintenance cycle prevents you from panicking when edges soften (which is normal) and helps you plan touch-ups strategically.
Day 1–3: Fresh & Sharp
Taper edges are crisp; the neckline is perfectly defined; top full and shaped from the barber’s blow-dry. This is photo day.
Appearance: Clean, professional, intentional.
Styling: Minimal effort required. The barber’s blow-dry creates shape that holds for 24–48 hours.
Maintenance: None. Just style normally.
Use for: Client meetings, photos, first-impression situations, dating.
Week 1: Still Sharp
Edges remain crisp; minimal regrowth visible; top styling still clean.
Appearance: Professional, polished, fresh.
Styling: Your blow-dry routine works effectively; shape holds well.
Maintenance: None required.
Use for: Professional settings, school, any situation where you want maximum polish.
Honest note: “This is the ‘no maintenance needed’ sweet spot. Enjoy it.”
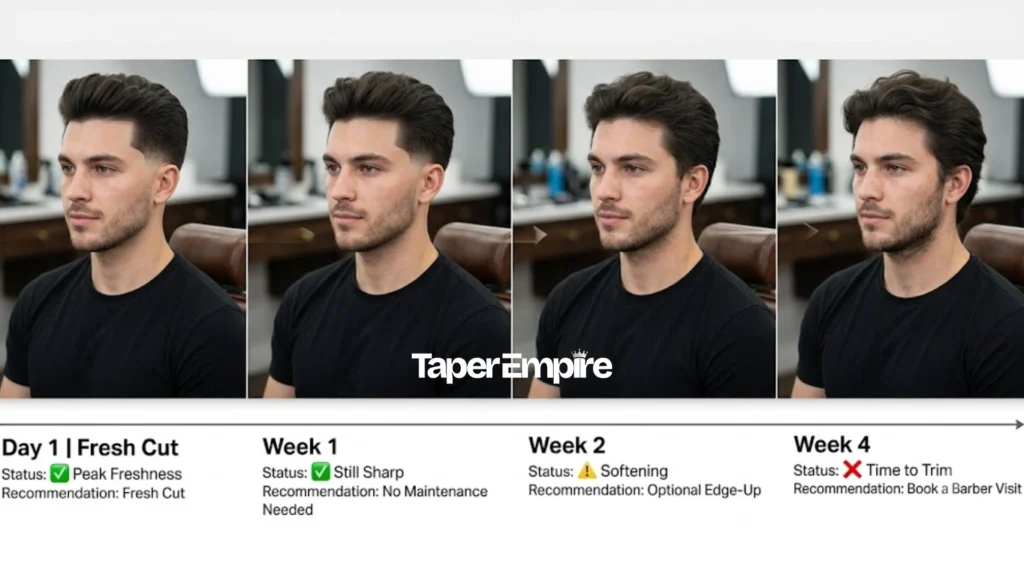
Week 2: Edges Start Softening
Taper edges begin to soften (approximately 1 mm regrowth showing); neckline less sharp; top still full.
Appearance: Still good; soft edges are natural and expected (taper advantage over fade).
Styling: Blow-dry still effective; shape maintained with styling.
Maintenance: Optional touch-up if edges bother you. Most guys skip.
Use for: School, casual, still acceptable for work if low taper.
Regional note: Humidity accelerates softening. Hair grows faster in high-humidity climates; regrowth becomes visible 7–10 days earlier than in dry climates.
Week 3: Visible Softening
Edges noticeably soft (2–3 mm regrowth); taper line blending into longer regrowth; top may feel fuller/puffier.
Appearance: Still styleable but less “intentional-looking”; starting to look casual.
Styling: Blow-dry maintains shape but edges less defined.
Maintenance: Touch-up recommended here. Especially critical for high tapers; optional for low.
Use for: Casual settings; not ideal for conservative workplaces.
Decision point: “If I want sharp edges next week, book touch-up now.”
Week 4: Blend-Out / Time for Full Refresh
Regrowth significant (4–5 mm); taper edges have blended into longer sides; top may look unkempt without daily styling.
Appearance: No longer “fresh”; reads as “hasn’t gotten haircut in month.”
Styling: Blow-dry works but requires more effort to look intentional.
Maintenance: Full cut recommended now.
Use for: Casual only; not professional.
Decision: “If I want to look sharp, get full cut this week.”
Touch-Up vs Full Cut: Quick Reference
Touch-up (2–3 weeks): 15–20 minutes at barber.
- Taper/neckline edges only
- Cost: Lower (approximately $15–25)
- Maintains sharpness between full cuts
- Best for: High tapers (require frequent edge work); guys who like sharp edges consistently
Full cut (3–4 weeks): 30–45 minutes at barber.
- Entire haircut refreshed (taper, neckline, top reshaped)
- Cost: Higher (approximately $25–50)
- Resets the clock; looks “new”
- Best for: Low/mid tapers (soft grow-out acceptable); everyone at month 4
Regional & Personal Factors
Humidity effect: High-humidity regions (South, Southwest, coastal areas) require maintenance 1 week earlier than low-humidity regions. Hair absorbs moisture, making regrowth more noticeable.
Growth rate (personal): Fast growers consider 2–3 week maintenance; regrowth shows quickly. Slow growers comfortable at 3–4 weeks.
Personal grooming standards:
- High standards (always sharp): 2–3 week touch-ups
- Medium standards (acceptable soft edges): 3–4 week full cuts
- Low standards (casual is fine): 4+ weeks; let it grow naturally
Common Maintenance Mistakes
Mistake 1: Taking the taper too high without intending to. If your barber cuts higher than you wanted, you’re locked into 2-week touch-ups. Use reference photos explicitly. Say “don’t take it higher than [temple/mid-ear].” At 1-week and 2-week check-ins, note if edges disappear faster than expected.
Mistake 2: Not visiting for touch-ups, then complaining about softness. Taper edges soften naturally. If you want sharp edges, schedule 2–3-week touch-ups. If soft edges are acceptable, go 3–4 weeks.
Mistake 3: Getting different barbers each time. Barber A cuts; Barber B does touch-up. Consistency disappears. Build a relationship with one barber; they learn your preferences and what works.
Mistake 4: Not styling between cuts. You got the blowout taper but skip daily blow-dry. By week 1, it looks flat. Styling is half the cut. If you won’t blow-dry, don’t get this haircut.
Mistake 5: Blaming barber for “bad grow-out.” By week 2, edges always soften. This is not barber error; it’s how tapers work. The whole point of a taper is soft regrowth, not hard lines. Touch up if you want sharp; accept softness if you prefer low-maintenance.
Putting It All Together: Choose Your Blowout Taper by Hair Type AND Face Shape
You’ve gathered data on variants, hair types, and face shapes. Now combine them into one decision.
Master Decision Matrix
Example Personas: Decision Stories
Persona 1: Straight Hair + Round Face
- Your profile: Straight hair that lays flat; round face wider than tall.
- Recommendation: High blowout taper with textured top.
- Why: High taper adds height for vertical elongation. Textured top compensates for straight hair’s flatness.
- Barber script: “High blowout taper with textured top. I have a round face and straight hair, so I want max height and texture.”
- Maintenance: 2-week touch-ups; 5–8 min daily blow-dry.
Persona 2: Wavy Hair + Square Face
- Your profile: Natural wave; strong angular jawline.
- Recommendation: Mid blowout taper with textured fringe.
- Why: Wavy hair gives natural volume; mid taper balances without excessive contrast. Textured fringe softens angularity.
- Barber script: “Mid blowout taper with textured fringe. I have wavy hair and a square face, so I want texture to soften my jawline without looking too sharp.”
- Maintenance: 2–3 week touch-ups; 2–4 min optional blow-dry.
Persona 3: Curly Hair + Oval Face
- Your profile: Naturally curly; balanced face shape.
- Recommendation: Mid blowout taper (any variant works; pick by maintenance).
- Why: Oval face = freedom. Curly hair = natural volume.
- Barber script: “Mid blowout taper with defined curls. I have an oval face and curly hair, so I mostly want the taper clean and curls defined.”
- Maintenance: 2–3 week touch-ups; 5–7 min diffuser blow-dry.
Persona 4: Afro Hair + Long Face
- Your profile: Natural coils; face taller than wide.
- Recommendation: Low–mid taper (low preferred); keep width at sides.
- Why: Long face needs width; avoid high taper that adds vertical length. Afro hair’s coil pattern is an asset.
- Barber script: “Low blowout taper. I have a longer face, so keep width at sides and don’t go too high. Clean edges to make the curls pop.”
- Maintenance: 2–3 week touch-ups; 3–5 min pick-and-mousse shaping.
Persona 5: Straight Hair + Oval Face
- Your profile: Straight hair; balanced face shape.
- Recommendation: Mid blowout taper (baseline safe choice).
- Why: Oval face = no correction needed. Straight hair = needs texture + blow-dry.
- Barber script: “Mid blowout taper with textured top. I have straight hair, so add texture to the cut. I’m OK with blow-drying daily.”
- Maintenance: 2–3 week touch-ups; 5–8 min daily blow-dry.
Your 5-Step Decision Process
Step 1: Identify your hair type. Straight, wavy, curly, or Afro.
Step 2: Identify your face shape. Round, square, oval, or long.
Step 3: Check the matrix above for your recommended variant.
Step 4: Assess maintenance commitment.
- 5–8 min daily blow-dry and 2-week touch-ups? Go high or textured fringe.
- 2–4 min optional blow-dry and 2-3 week touch-ups? Go mid.
- Don’t blow-dry; prefer soft edges? Go low and accept 3–4 week growth.
Step 5: Bring 2 photos and use your barber script.
Quick Tip:
Uncertain about your combination? Our tool personalizes recommendations by cross-referencing your hair type and face shape, then shows you style examples for your exact match.
Is a Blowout Taper OK for Work? A Quick Guide by Variant & Industry
Same cut reads differently in different settings. Context matters.
Acceptability by Variant & Setting
| Variant | Conservative Office (Finance, Law) | Balanced Office (Tech, Design) | Creative/Casual (Fashion, Media) | School | Dating |
|---|---|---|---|---|---|
| Low | ✓ Fully acceptable | ✓ Great | ✓ Fresh | ✓ Perfect | ✓ Professional |
| Mid | ✓ Acceptable | ✓ Ideal | ✓ Great | ✓ Great | ✓ Balanced |
| High | ⚠️ Borderline; may read as “trendy” | ✓ Good | ✓ Expected | ✓ Great | ⚠️ Bold statement |
| Textured Fringe | ❌ Too trendy | ✓ Good | ✓ Perfect | ✓ Popular | ✓ Modern |
Variant Assessments
Low Blowout Taper: The Safe Universal Choice
- Conservative office: ✓ Fully acceptable; looks polished.
- Casual/creative: ✓ Still fresh; understated.
- School: ✓ Clean, professional.
- Dating: ✓ Professional, confident.
- Honest take: “If you’re unsure, pick low. It works everywhere.”
Mid Blowout Taper: The Balanced Choice
- Conservative office: ✓ Acceptable; mid taper reads as “intentional grooming,” not “fashion statement.”
- Casual/creative: ✓ Ideal; clearly fresh but not extreme.
- School: ✓ Popular; on-trend.
- Dating: ✓ Modern, confident.
- Honest take: “Mid works in most professional settings. High-level client meetings? Low is safer. Friday casual? Mid is perfect.”
High Blowout Taper: The Bold Statement
- Conservative office: ⚠️ Borderline; may read as “too trendy” to older decision-makers.
- Casual/creative: ✓ Expected; fits the vibe.
- School: ✓ Popular; on-trend.
- Dating: ✓ Confident, modern.
- Honest take: “High is bold. If your workplace is conservative or hierarchical, wait until Friday or skip high. If casual/creative, it’s perfect.”
Textured Fringe: The Viral Variant
- Conservative office: ❌ Not ideal; reads as fashion-forward/young.
- Casual/creative: ✓ Perfect; trend-forward.
- School: ✓ Very popular; on-trend.
- Dating: ✓ Modern, confident, stylish.
- Honest take: “Textured fringe is the most ‘TikTok’ variant. Amazing for school/dating/casual, but wear with caution in conservative offices.”
Industry-Specific Guidance
Finance, law, conservative services: Low or mid. High works if you’re young/peer-level; skip if you’re interviewing or meeting clients.
Tech, design, software: Any variant. Mid or high expected. Fringe is acceptable.
Fashion, media, entertainment: Any variant. High and fringe are expected; low reads as conservative.
Education (teaching): Low or mid. Fringe acceptable if you’re younger instructor; avoid high if you’re first-year.
Sales/client-facing: Low or mid. You want to look groomed, not “trying too hard.” High works if clients are young/casual.
Honest take: “You can wear any variant anywhere. But high taper + textured fringe in a conservative finance office will get comments. Low taper gets zero comments. Pick based on your workplace culture and risk tolerance.”
5 Blowout Taper Mistakes (And How to Avoid Them)
These are the most common errors and how to prevent them.
Mistake 1: Not Enough Length on Top to Begin With
What happens: Barber cuts top too short. After blow-dry, there’s no volume to work with. It looks like a taper with medium-length hair, not a blowout.
Why it happens: Miscommunication. You say “short on sides,” barber thinks you also want short on top.
Solution: Be explicit: “Leave 2–3 inches on top. I want volume. Short on sides only.”
Prevention: Bring reference photo showing top length. Ask barber before they start: “Is this 2+ inches?”
Honest note: “Under 2 inches, there’s nothing to blow out. This cut needs length on top to define it.”
Mistake 2: Taper Taken Too High Without Intent
What happens: You ask for mid; barber cuts high. Now you’re locked into 10–14 day touch-ups instead of 3–4 weeks.
Why it happens: Barber misunderstands “mid” or barber’s default is high.
Solution: Use photos. Point to reference photo: “Don’t go higher than this.”
Prevention: After haircut, look in mirror. If edges disappear faster than you expected, note it for next cut. Tell next barber: “Last guy went too high. This time, start at [temple/mid-ear].”
Honest note: “High tapers require commitment. If you don’t want 2-week touch-ups, specify low or mid.”
Mistake 3: Wrong Product for Your Hair Type
What happens: You use heavy pomade on fine straight hair. Volume collapses. Or you use light mousse on thick curly hair. No hold.
Why it happens: You use whatever’s in your bathroom; don’t consider hair-type match.
Solution: Match product to texture. Straight hair = light paste or powder. Curly hair = cream or mousse.
Prevention: Ask barber: “What product should I use for my hair type?” They’ll recommend the right one.
Honest note: “A good product is 30% of the style. Wrong product is the difference between fresh and flat.”
Mistake 4: Skipping Daily Blow-Dry and Expecting the Cut to Carry Itself
What happens: You get the blowout taper, skip blow-dry for 2 days, then complain it looks flat.
Why it happens: You underestimate styling commitment.
Reality: “Blowout taper is 50% cut, 50% styling. If you won’t blow-dry, don’t get this cut.”
Solution: Commit to 5–8 min daily blow-dry. Use a timer. Make it routine.
Prevention: Before booking, ask yourself: “Will I blow-dry every morning?” If no, pick a lower-maintenance cut (low taper, no fringe, let it be natural).
Honest note: “Straight hair especially. Wavy/curly can get away with skip days. Straight hair has zero margin for error.”
Mistake 5: Not Scheduling Maintenance Ahead
What happens: You get the high blowout taper. By week 2, edges soften. You wait until week 4 to book. Barber is booked. You’re stuck looking unkempt.
Why it happens: You underestimate how fast it softens or assume you can “walk in” anytime.
Solution: Book next cut BEFORE you leave the chair. Lock in 2-week or 3-week recurring appointments.
Prevention: Ask barber: “When should I come back?” They’ll tell you. Book on your phone immediately.
Honest note: “High taper + popular barber = you need to book ahead. If your barber is booked 2 weeks out, you can’t get a 2-week touch-up.”
Frequently Asked Questions
Q1: What’s the difference between a blowout taper and a low taper fade?
A blowout taper has a gradual, soft taper on the sides and more length on top for volume styling. A low taper fade has a crisper, more dramatic fade that loses sharpness faster. Tapers offer softer grow-out; fades offer sharper definition. Choose taper for low-maintenance edges, fade for crisp consistency.
Q2: Does a blowout taper work on straight hair?
Yes, but straight hair requires texture cut into the top and daily blow-drying to maintain volume. Without texture and blow-drying, straight hair lays flat. If you won’t blow-dry daily, choose a different cut. Wavy and curly hair carry the style more naturally without daily styling effort.
Q3: How often do I need to trim a blowout taper?
Touch-up (edges only) every 2–3 weeks keeps taper sharp. Full cut (refresh entire haircut) every 3–4 weeks, depending on growth and maintenance preference. Low tapers can stretch to 4 weeks; high tapers need 2-week touch-ups for sharpness. Book maintenance ahead if your barber is popular.
Q4: How do I ask my barber for a blowout taper?
Say “low/mid/high blowout taper” (pick height), then specify: “Keep it clean around the ears and neckline” and “Leave length on top for volume.” Bring 2 reference photos one of the taper height, one of the top style. Avoid vague requests like “something fresh.”
Q5: Can I get a blowout taper if I have curly hair?
Yes, absolutely. Curly hair naturally provides volume, making this cut easier than straight hair. Use curl cream or mousse, diffuser blow-dry (optional), and a pick to shape. Clean taper edges keep curls defined. Curly hair is ideal for this style with minimal styling burden.
Q6: Is a blowout taper professional enough for an office job?
Low or mid variants work in most professional settings. High variants or textured fringe read as more trendy. In conservative offices (finance, law), low is safest. In tech/creative, any variant works. When in doubt, show your barber your workplace and ask if the cut fits your environment.
Key Takeaways
A blowout taper is a versatile, modern haircut that works on every hair type and face shape when you match the right variant to your needs. The style breaks down into five clear decisions: height (low/mid/high), texture preference (standard/textured fringe/perm), your hair type (straight/wavy/curly/afro), and your face shape (round/square/oval/long).
The cut itself is half the equation; the daily blow-dry is the other half. Straight hair demands the most styling effort. Wavy and curly hair carry the style naturally. Afro hair requires minimal intervention.
Maintenance runs from 2–4 weeks depending on your chosen height. High tapers need 2-week touch-ups; low tapers grow out softly to 4 weeks. Low and mid variants work in professional settings; high and textured fringe are trend-forward and bolder.
Quick Tip:
“Now set up a maintenance reminder. Our tool generates a personalized touch-up schedule based on your taper height and growth rate so you never miss a critical week.”