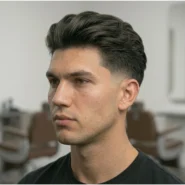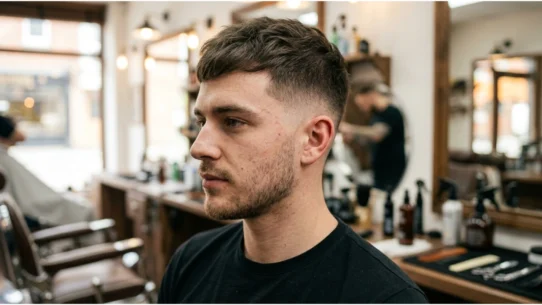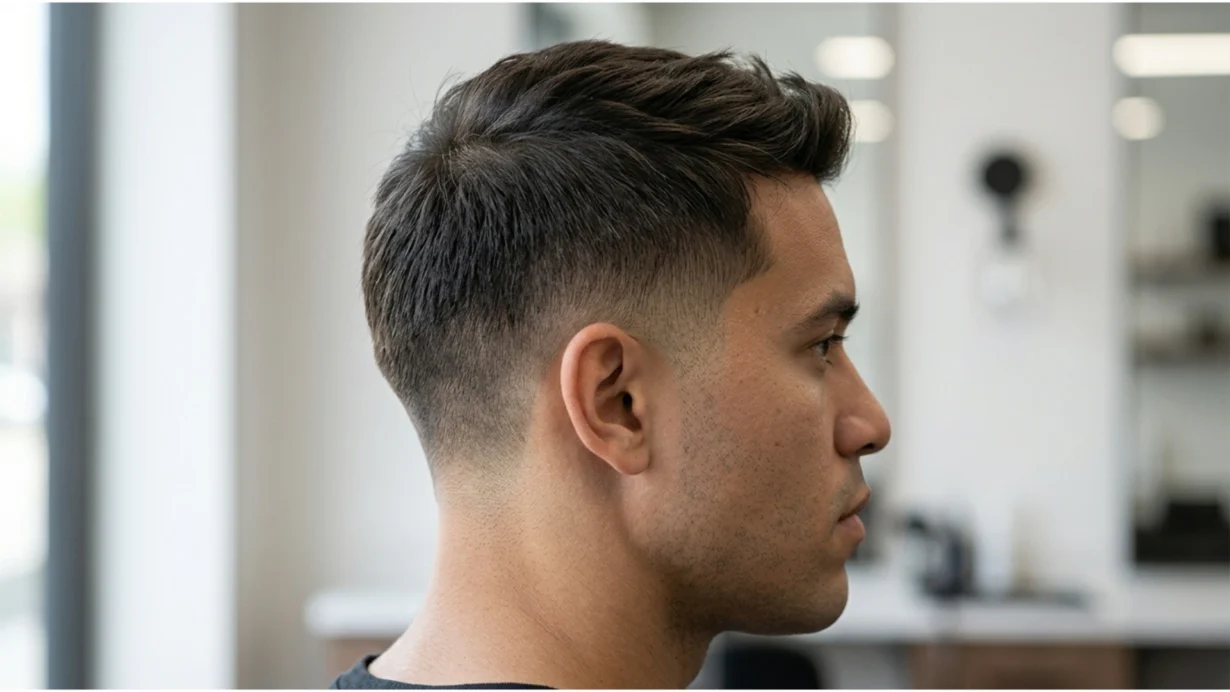

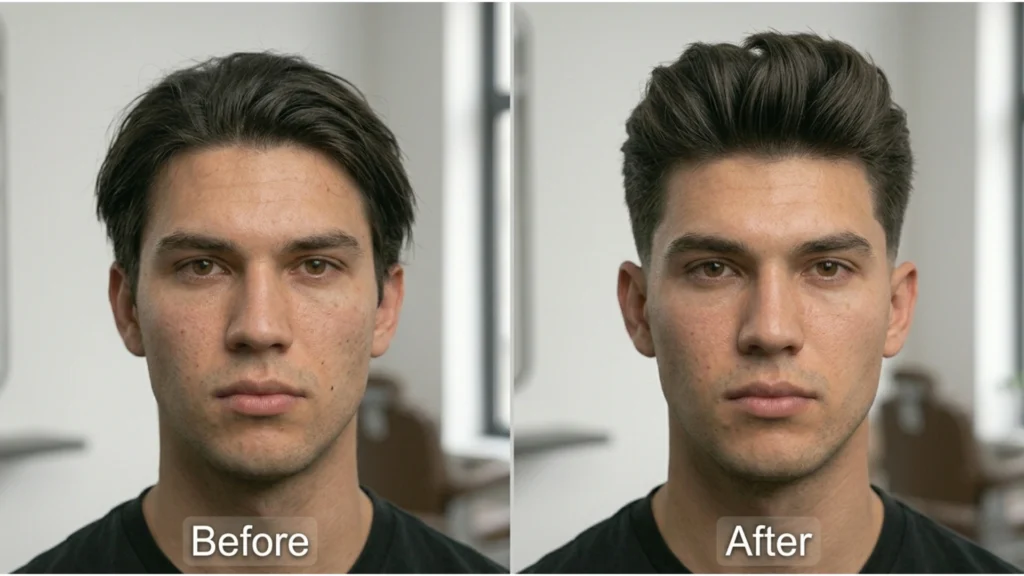
A low taper fade on straight hair is a versatile men’s haircut in which the sides gradually shorten, starting just above the ears and neckline, blending down to the skin with clipper guards. The straight hair texture highlights the fade’s precision, creating clean contrast that lasts 3 to 4 weeks between trims.
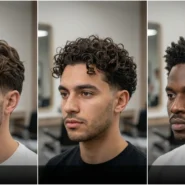
This guide covers 25 low-taper fade styles designed specifically for straight hair from classic slick-backs to modern blowouts and textured crops. You’ll learn exactly how to choose the right style for your face shape and hair thickness, what to tell your barber word-for-word, and how to style it at home in under 5 minutes.
Table of Contents
What Is a Low Taper Fade on Straight Hair and Why Does It Work So Well?
A low taper fade on straight hair starts just above the ears and gradually blends down toward the neckline using clipper guards from #3 down to #0. Straight hair naturally highlights every detail of the fade, creating a sharp, clean contrast that looks polished with minimal effort. It lasts 3 to 4 weeks between trims, making it one of the most low-maintenance options for men.
- Starts just above the ears using guards from #3 down to #0 or #1 at the base
- Straight hair shows fade precision more clearly than any other hair texture
- Lasts 3 to 4 weeks between barber visits, longer than curly or wavy hair
- Works for every face shape with the right top style adjustment
What Is a Low Taper Fade on Straight Hair?
A low taper fade on straight hair is a haircut in which the sides gradually shorten, starting just above the ears and neckline, blending down with clipper guards such as 0, 1, 2, or 3. The straight hair texture naturally highlights the fade’s precision, creating a sharp, clean contrast with minimal maintenance required.
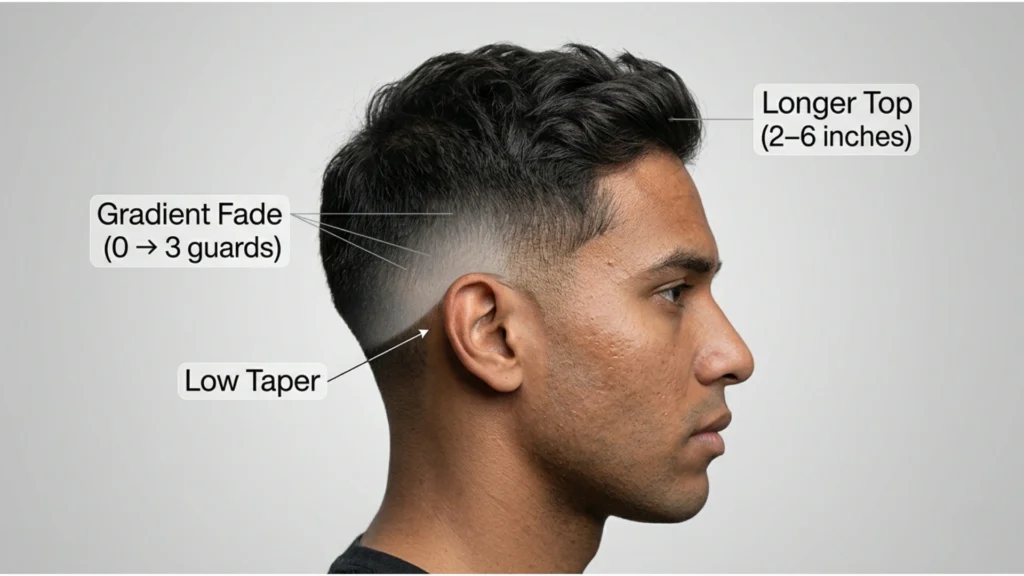
Think of it this way: Your hair on top stays longer, usually 2 to 6 inches, depending on your style. The sides and back gradually shorten as they taper down toward your ears and neck. The fade starts low on your head (that’s why it’s called a “low” taper), which makes it super versatile for everything from job interviews to weekend hangouts.
How the Low Taper Fade Works
The word “taper” means your hair gradually gets shorter near the sideburns and neckline. The word “fade” means the barber cuts it really close to the skin using different clipper guards, then blends it all together so there are no harsh lines.
The “low” part tells you where the fade starts, just above your ears and around the natural hairline at the back of your neck.
Here’s what makes it different from other fades:
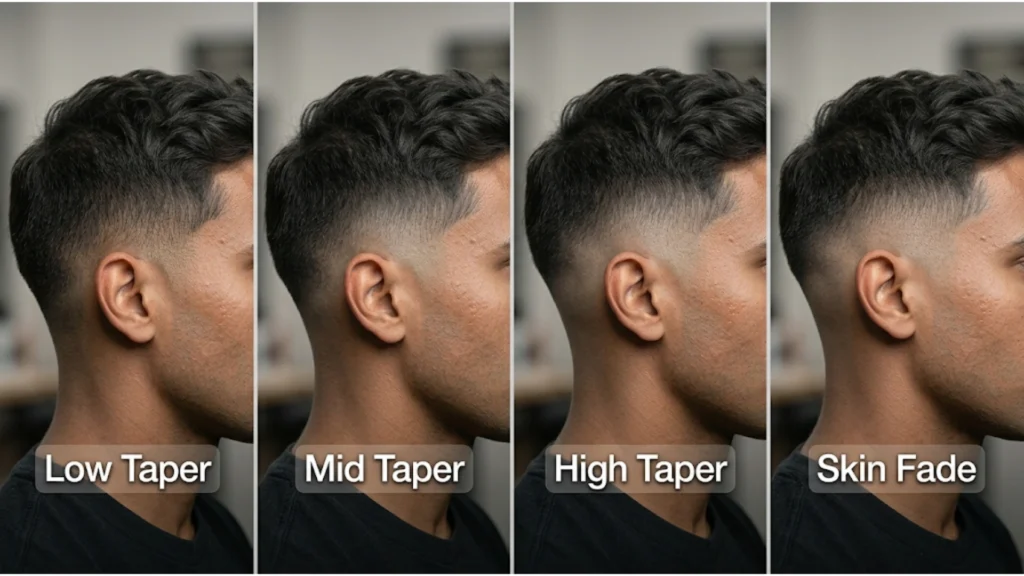
- Low taper fade: Starts just above the ears, subtle and professional
- Mid taper fade: Starts in the middle of your head, with a more noticeable contrast
- High taper fade: Starts near your temples, bold and dramatic
- Skin fade: Goes all the way down to bare skin, maximum contrast
According to professional barbers at the American Barber Association, the low taper fade removes about 15 to 20 percent less hair than a mid or high fade, making it the most versatile option for guys who need to look sharp at work but still want style.
Why Straight Hair Is Perfect for This Cut
If you have straight hair, you’ve got a huge advantage with this haircut. Here’s why:
Straight hair reveals every detail. When your hair is naturally smooth and flat, the barber’s blending work shows up perfectly. There’s no curl to hide mistakes, which means a skilled barber can create an incredibly clean, sharp look.
The contrast pops. Your straight hair on top naturally contrasts with the faded sides. Even without styling, the haircut looks intentional and put-together.
It lasts longer. Straight hair grows more evenly than curly or wavy hair, so your fade holds its shape for 3 to 4 weeks instead of needing a trim every 2 weeks.
Key Point #1: Straight hair highlights the fade’s craftsmanship. Every clipper stroke shows, which is why choosing an experienced barber is absolutely critical for this cut.
Why the Low Taper Fade Works Uniquely Well on Straight Hair
The Precision Advantage
When a barber works on straight hair, there’s nowhere to hide. Curly hair can cover up small blending mistakes because the curls bounce and create texture. Straight hair? It just lays flat and smooth. Every transition from one length to another is totally visible.
This forces good barbers to achieve seamless blending, resulting in one of the cleanest-looking fades you can get. The fade’s sharp lines are accentuated because your straight strands lay flat and show off the gradient perfectly.
Low Maintenance, High Impact
One of the best things about getting a low taper fade with straight hair is how little daily effort it takes.
Your hair naturally falls into place. Most mornings, you’re looking at 3 to 5 minutes of styling, maybe less if you go with a super short style like a crew cut. Compare that to guys with curly or wavy hair who spend 10 to 15 minutes just getting their texture to cooperate.
Fact #1: A 2024 survey by Men’s Grooming Today found that 73 percent of men with straight hair cited “low daily effort” as their top reason for choosing a low taper fade over other haircuts.
Volume Control Without Sacrifice
Here’s a problem a lot of guys with straight hair face: the helmet look. When your hair is all one length, it can look heavy and flat, like you’re wearing a hair helmet.
The low-taper fade fixes this by reducing weight on the sides. You get dimensional contrast, heavier on top, lighter on the sides, which gives the illusion of natural volume even if you have fine or thin hair.
The cut creates visual interest without requiring anything drastic. It’s a subtle change that makes a big difference.
25 Best Low Taper Fade Straight Hair Styles
Every style below is designed specifically for straight hair. We’ve included exactly what to tell your barber, how to style it at home, what products to use, and which face shapes work best with each look.
The styles are organized into six groups to make it easy to find what you’re looking for.
GROUP 1: Classic & Professional Styles
These are the timeless cuts that work in any setting, office, date night, family dinner, you name it.
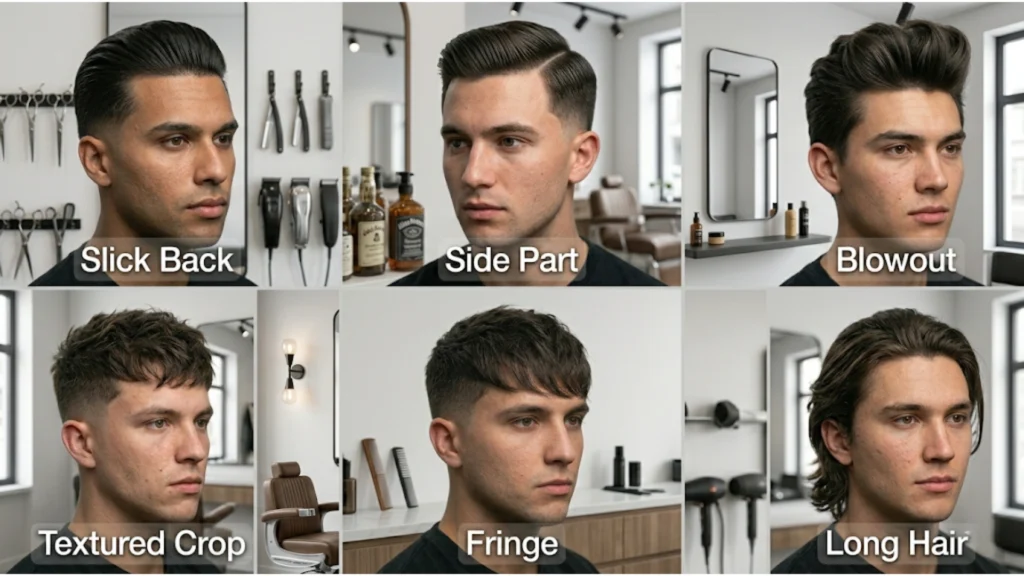
1. Classic Slick Back Low Taper
The top of your hair is combed straight back with a shiny, polished finish using strong-hold pomade. The low taper keeps the sides tight and clean, giving you that classic movie-star look without being over the top.
Best For: Guys with oval or square faces who need a professional, sophisticated style. Perfect for job interviews, formal events, or just feeling sharp every day.
Barber Instructions:
“I want 3 to 4 inches on top, a low taper fade starting right at my ear line, blended with a number 1 to number 3 guard. Squared or rounded neckline, your call. I have straight hair, so make sure the blend is seamless.”
How to Style:
- Start with damp hair not soaking wet, just towel-dried
- Scoop a dime-sized amount of strong-hold pomade into your palm
- Rub it between your hands to warm it up
- Run your hands through your hair from front to back, coating everything evenly
- Use a fine-tooth comb to slick your hair straight back
- Blow-dry on low heat while combing to lock the shape in place
- Finish with 30 seconds of cool air to set the shine
Product: Strong-hold pomade (creates that wet-look shine and keeps everything in place all day)
2. Side Part / Comb Over Low Taper
This style features a deep side part with your hair combed neatly to one side. It’s structured, refined, and screams “I have my life together.”
The low taper provides clean contrast on the sides, framing your face with sharp precision.
Best For: Oval or oblong faces. Great for job interviews, business meetings, or any time you need to look polished and professional.
Barber Instructions:
“Give me a deep side part you can shave a hard part if you want. Leave 3 to 4 inches on top, low taper fade with a number 2 guard blend. Keep the neckline clean.”
How to Style:
- Apply a lightweight cream to damp hair
- Use a comb to create a deep side part (about one-third from the side of your head)
- Blow-dry while directing your hair to the side with the comb
- Once dry, apply a small amount of matte paste to hold without shine
- Smooth down any flyaways with your hands
Product: Lightweight cream plus matte paste
3. Middle Part Low Taper
Your hair is parted straight down the center with flow on both sides. This is the Gen Z favorite. It’s modern, casual, and works great if you want a laid-back look that still has structure.
The low taper keeps it grounded so you don’t look like you walked out of a 90s boy band.
Best For: Oval or heart-shaped faces. Perfect for casual hangouts, creative jobs, or if you just like the middle-part aesthetic.
Barber Instructions:
“I want 4 to 5 inches on top with some layered texture, a center part, and a low taper starting above my ears.”
How to Style:
- Blow-dry your hair with a round brush to add some volume
- Use a comb to create a clean center part
- Apply a small amount of matte clay and finger-comb it through your hair for natural flow
- Let the sides fall naturally, don’t overthink it
Product: Sea salt spray (for texture) plus matte clay
4. Crew Cut Low Taper
This is a short, even length on top, usually 1 to 2 inches, with a low taper fade on the sides. It’s military-inspired, ultra-low maintenance, and perfect if you don’t want to spend any time styling your hair in the morning.
Best For: All face shapes, especially guys who are active, play sports, or just want a no-fuss haircut.
Barber Instructions:
“Give me 1 to 2 inches on top, blend it with a number 3 or 4 guard, low taper starting at the ear line, clean edge-up.”
How to Style:
Honestly? Just wash and go. If you want a tiny bit of texture, rub a pea-sized amount of lightweight cream through your hair while it’s damp. That’s it.
Product: Optional lightweight cream if you want a little definition
5. Ivy League Low Taper
Think of this as a slightly longer crew cut with enough hair on top to create a subtle side part. It’s preppy, polished, and works great for college students or young professionals.
Best For: Oval or square faces. Perfect for campus, internships, or entry-level jobs where you want to look put-together without trying too hard.
Barber Instructions:
“I want 2 to 3 inches on top with a slight side part, low taper fade with a number 2 blend, clean neckline.”
How to Style:
- Apply molding paste to damp hair
- Create a side part with your fingers (doesn’t need to be perfect)
- Finger-comb for natural texture, no need to use an actual comb
Product: Molding paste
6. Long Slick Back Low Taper
This is for guys who want to make a statement. You keep 5 to 7 inches of straight hair on top and slick it all back with a glossy, high-impact finish. The low taper keeps the sides clean so the long top doesn’t look messy.
Best For: Oval faces and bold personalities. Great for formal events, creative industries, or if you just love the long-hair look.
Barber Instructions:
“Leave 5 to 7 inches on top with some layers for movement. Low taper fade, rounded neckline.”
How to Style:
- Apply strong-hold gel to damp hair
- Use a fine-tooth comb to slick everything straight back
- Blow-dry on low heat while combing to set the shape
- Finish with a shine-enhancing spray for extra gloss
Product: Strong-hold gel plus enhancement spray
GROUP 2: Volume & Blowout Styles
These styles are all about adding volume, lift, and that “just styled it” look. Perfect if your straight hair tends to fall flat.
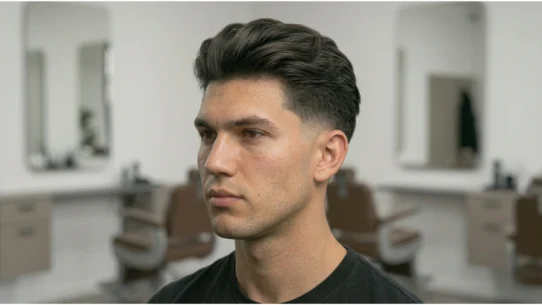
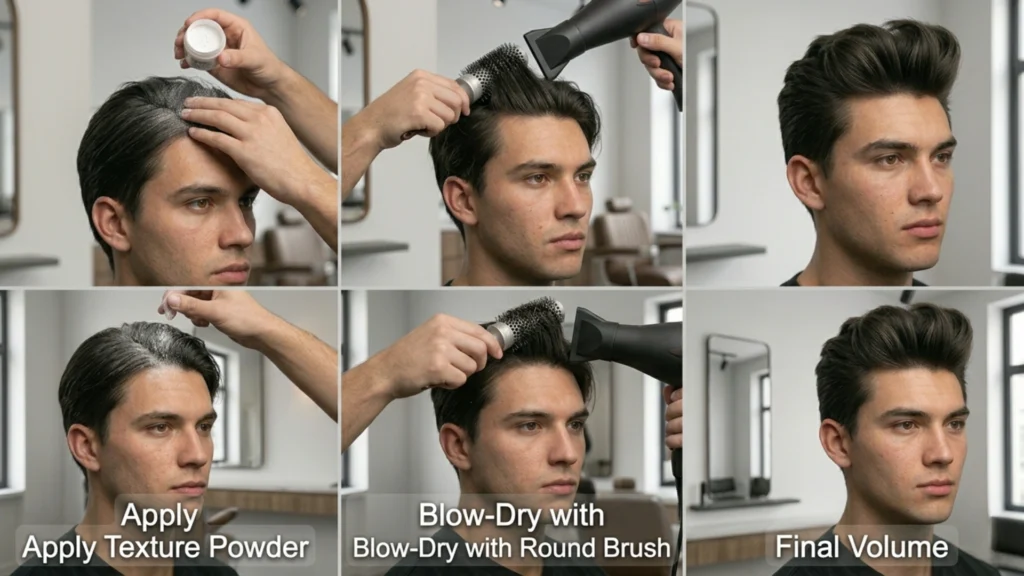
7. Blowout Low Taper (Straight Hair Specific)
A blowout low taper on straight hair features lifted, voluminous hair on top, achieved by blow-drying upward with a round brush, while the low taper keeps sides clean. Apply texture powder to flat, straight hair before blow-drying to create grip and lasting volume.
This is the ultimate volume style for straight hair. Your top looks airy, fluffy, and full of life while the low taper keeps everything clean underneath.
Best For: All face shapes, especially guys with fine or thin straight hair who need volume. Works for casual and semi-formal settings.
Barber Instructions:
“Give me 3 to 4 inches on top with heavy texturizing and layers. Low taper starting at the ear line, blended with number 1 to number 3 guards.”
How to Style (The Straight Hair Blowout Fix):
Here’s the thing about straight hair it wants to lie flat. Getting blowout volume requires a
specific technique:
- Start with damp hair (not soaking wet towel-dry first)
- Sprinkle texture powder on your roots or spray mousse all over
- Grab a round brush and blow-dryer
- Blow-dry your hair upward, lifting at the roots with the brush
- Point the dryer away from your scalp to maximize lift
- Once your hair is completely dry, spray sea salt spray and scrunch it with your fingers
- Finish with 30 seconds of cool air to lock the volume in place
Product Stack: Texture powder (or mousse), sea salt spray, round brush
Tip #1: The secret to blowout volume on straight hair is having your barber remove weight from the top during the cut. Tell them to “texturize heavily” or “remove bulk so my hair has movement.” Without this step, your hair will be too heavy to hold volume.
8. Pompadour Low Taper
The front of your hair is lifted high and swept back, creating bold volume with a vintage-modern vibe. The low taper balances all that height with clean, tapered sides.
Best For: Oval or square faces. Great if you’re confident and want a style that stands out.
Barber Instructions:
“I want 4 to 5 inches on top, shorter toward the back for a gradual slope. Low taper, clean edge-up.”
How to Style:
- Apply mousse to damp hair
- Blow-dry the front upward using a round brush—really lift it high
- Once dry, slick the back with pomade
- Finish with a light mist of hairspray to hold everything in place
Product: Mousse, pomade, hairspray
9. Quiff Low Taper
The quiff is like a pompadour’s cooler younger brother. Your hair is lifted upward and slightly forward at the front, creating dynamic height without looking too formal.
Best For: Heart-shaped or oval faces. Perfect for casual, youthful styles.
Barber Instructions:
“Give me 3 to 4 inches on top with layers for lift. Low taper fade.”
How to Style:
- Blow-dry the front of your hair upward with a round brush
- Apply matte clay
- Use your fingers to push the front upward and slightly forward
Product: Matte clay
10. Textured Blowout Fringe Low Taper
This combines blowout volume with a messy fringe that falls forward over your forehead. It’s laid-back, modern, and has that “I woke up like this” vibe (even though you definitely didn’t).
Best For: Round or oval faces. Great for casual settings, creative jobs, or if you just like the messy look.
Barber Instructions:
“I want 3 to 4 inches on top with choppy layers and a blunt fringe. Low taper.”
How to Style:
- Blow-dry with your fingers (not a brush) to keep it natural
- Spray sea salt spray while it’s still slightly damp
- Scrunch the fringe forward with your hands
- Let it air-dry the rest of the way for maximum texture
Product: Sea salt spray, lightweight cream
11. High Volume Top Low Taper
Maximum volume on the crown of your head creates a rounded, bold silhouette. This is for guys who want a statement look.
Best For: Confident personalities who aren’t afraid to stand out.
Barber Instructions:
“Give me 4 to 5 inches on top in a rounded shape with heavy texturizing. Low taper.”
How to Style:
- Blow-dry upward with a diffuser attachment
- Apply texture powder at the roots while drying
- Shape with your fingers—no combing
Product: Texture powder, mousse
GROUP 3: Textured & Messy Styles
These are for guys who want a relaxed, effortless look. The key is making the messiness look intentional, not like you just rolled out of bed.
12. Messy Low Taper Straight Hair
A messy low taper on straight hair features a tousled, lived-in top with choppy texture, while the low taper keeps sides clean. Achieve this by applying matte clay to dry hair, finger-combing randomly, and avoiding any structured parting or combing.
This is the “I didn’t try but I look great anyway” style. Your top has random, tousled movement and a choppy texture, and the low taper keeps it looking intentional rather than sloppy.
The Straight Hair Challenge:
Straight hair naturally wants to be neat and structured. Getting controlled messiness takes some technique.
Best For: Round, oval, or heart-shaped faces. Perfect for casual wear, students, or laid-back professionals.
Barber Instructions:
“Give me 3 to 4 inches on top with heavy texturizing use point-cutting for choppy layers. Low taper fade.”
How to Style (How to Get Messy Texture on Straight Hair):
Here’s the trick: Straight hair looks messy when it’s styled dry, not damp. Moisture makes it clump together and look neat, which is the opposite of what you want.
- Make sure your hair is completely dry not even a little damp
- Scoop some matte clay and rub it between your palms
- Run your fingers through your hair in random directions—front to back, side to side, whatever
- Lift and twist small sections for separation
- Spray texture spray for extra grip if needed
- Do NOT use a comb, fingers only
Product Stack: Matte clay, texture spray
Tip #2: For straight hair, “messy” is all about product choice and technique. Always use matte products (never shiny pomade), and always use your fingers (never a comb).
13. Textured Crop / French Crop Low Taper
This features a choppy, blunt fringe with textured layers on top. It’s youthful, modern, and full of movement and personality.
The low taper creates contrast between the structured fringe and the clean sides.
Best For: Square or round faces. Great for younger guys or anyone who wants a modern edge.
Barber Instructions:
“Give me 2 to 3 inches on top with a blunt horizontal fringe and choppy texture. Low taper starting at the ear line.”
How to Style:
- Apply matte paste to damp hair
- Use your fingers to push the fringe forward
- Let it air-dry or blow-dry with your hands (not a brush)
Product: Matte paste
14. Fluffy Hair Low Taper
Soft, rounded, tousled shape with natural volume and an airy finish. Think of it as the opposite of sleek; everything about this cut is soft and approachable.
Best For: Youthful looks, oval faces.
Barber Instructions:
“I want 3 to 4 inches on top with rounded layers. Low taper.”
How to Style:
- Blow-dry with a diffuser attachment (spreads the air out so you don’t blow your hair flat)
- Apply mousse while drying
- Scrunch with your fingers for softness
Product: Mousse, sea salt spray
15. Spiky Textured Low Taper
Short, upward spikes on top for a dynamic, energetic look. This is playful and fun without being childish.
Best For: Oval or diamond faces. Great for active, playful personalities.
Barber Instructions:
“Give me 2 to 3 inches on top with choppy texture. Low taper.”
How to Style:
- Apply wax to damp hair
- Use your fingers to twist small sections upward into spikes
Product: Wax
16. Choppy Layers Low Taper
Heavily textured, layered top with piecey separation. This is perfect if you have thick, straight hair and need to remove some weight.
Best For: Thick straight hair that feels heavy.
Barber Instructions:
“I want 3 to 4 inches on top with heavy point-cutting for separation. Low taper.”
How to Style:
- Apply lightweight cream to damp hair
- Finger-comb for natural separation, let the layers do the work
Product: Lightweight cream
GROUP 4: Fringe & Bang Styles
These styles feature some kind of fringe or bangs falling over your forehead. They’re bold, modern, and great for adding structure to your face.
17. Edgar Cut Low Taper
This features a blunt, horizontal fringe straight across your forehead with a low taper fade. It’s bold, geometric, and extremely popular with Gen Z—especially in the Southwest USA and among Latino communities.
Best For: Angular faces, bold personalities. Perfect for casual settings and streetwear aesthetics.
Barber Instructions:
“I want an Edgar cut straight-line fringe across the forehead, 2 to 3 inches on top, low taper starting at my temples, sharp edge-up.”
How to Style:
- Apply matte paste
- Use a comb to push your fringe forward into a straight horizontal line
- Apply edge control around your hairline for a crisp finish
Product: Matte paste, edge control
18. Curtain Bangs Low Taper
Your fringe is parted in the center and falls to both sides, softly framing your face. It’s the opposite of the Edgar cut; instead of sharp and geometric, this is soft and approachable.
Best For: Oval or heart-shaped faces. Great for guys who want a softer, more relaxed look.
Barber Instructions:
“Give me 4 to 5 inches on top with a center-parted fringe and layered texture. Low taper.”
How to Style:
- Blow-dry your fringe outward on both sides using a round brush
- Apply a lightweight cream
- Let it fall naturally, no need to force it into place
Product: Lightweight cream
19. Blunt Fringe Low Taper
A bold, straight-cut fringe across your forehead with clean geometric lines. This makes a statement without going full Edgar cut.
Best For: Oval faces, guys who want a bold look.
Barber Instructions:
“I want a blunt fringe, 2 to 3 inches on top, low taper.”
How to Style:
- Blow-dry your fringe straight down
- Apply matte paste to hold it in place
Product: Matte paste
20. Forward Fringe Low Taper
A natural fringe that falls forward over your forehead without harsh, blunt lines. It’s casual and easy.
Best For: Round faces (it helps elongate your face), casual looks.
Barber Instructions:
“Give me 3 to 4 inches on top with a soft fringe. Low taper.”
How to Style:
- Blow-dry your fringe forward
- Apply lightweight cream
Product: Lightweight cream
GROUP 5: Long Hair Variations
These are for guys who want to keep some serious length on top while still having clean, structured sides.
21. Long Hair Low Taper
A low taper fade with long straight hair features 5 to 7 inches on top styled back or to the side, while the low taper keeps sides clean. The contrast creates sleek elegance with modern edge, perfect for bold, refined men.
This is a bold choice. You’re keeping 5 to 7 inches of straight hair on top and styling it back for a smooth, controlled look. The low taper keeps it from looking messy or unkempt.
Best For: Bold personalities, creative professionals, formal events.
Barber Instructions:
“Leave 5 to 7 inches on top with layers for movement. Low taper starting at the ear line, rounded neckline.”
How to Style:
- Apply strong-hold gel or pomade to damp hair
- Use a fine-tooth comb to slick everything straight back
- Blow-dry to set the shape
- Finish with a shine spray if you want extra gloss
Product: Strong-hold gel or pomade
22. Man Bun Low Taper
If you have 6 or more inches of hair, you can tie it into a top bun while keeping the sides clean with a low taper. It’s the perfect balance between professional and casual.
Best For: Men with longer hair who want versatility, wear it down when you’re off work, and tie it up when you need to look polished.
Barber Instructions:
“Keep 6-plus inches on top. Low taper fade, clean neckline.”
How to Style:
- Gather your hair into a high bun on the crown of your head
- Tie it with a hair tie
- Apply edge control around your hairline for a clean finish
Product: Edge control, hair tie
GROUP 6: Bold & Statement Styles
These are for guys who aren’t afraid to stand out. They’re edgy, modern, and definitely turn heads.
23. Mullet Low Taper
Short on the sides with a low taper, longer at the back for a retro-modern vibe. The mullet is back, and when paired with a low taper fade, it looks intentional and stylish rather than outdated.
Best For: Bold personalities, edgy styles.
Barber Instructions:
“Give me 3 to 4 inches on top, keep the back long—6-plus inches. Low taper on the sides.”
How to Style:
- Apply matte clay to the top
- Finger-comb it for texture
- Let the backflow naturally; no product is needed there
Product: Matte clay
24. Faux Hawk Low Taper
A central strip of volume running from the front to the back of your head, with low taper on both sides. It’s edgy without going full mohawk.
Best For: Diamond or oval faces. Great for guys who want bold, attention-grabbing styles.
Barber Instructions:
“Give me 3 to 4 inches on top in a central strip, short on the sides, low taper.”
How to Style:
- Apply wax to damp hair
- Use your fingers to push the hair upward into a central ridge
Product: Wax
25. Hard Part Low Taper
This features a shaved or razor-sharp parting line for maximum definition. The hard part is literally carved into your hair, creating a clean, polished, modern look.
Best For: All face shapes. Perfect for guys who want clean, sharp, modern styles.
Barber Instructions:
“I want a hard part shaved line on one side. Leave 3 to 4 inches on top, low taper.”
How to Style:
- Apply pomade
- Use a comb to slick your hair to the side along the hard part
Product: Pomade
Twenty-five styles are a solid starting point. If you’d rather know which one is structurally built for your face, TaperMatch scans your facial geometry and returns your top three matches with the barber brief already written.
How to Choose the Best Low Taper Fade for Your Face Shape & Hair Type
Not every style works for every guy. Your face shape and hair thickness play a huge role in which variation will look best on you.
Here’s how to match the right style to your features.
Face Shape Guide
For round faces, choose a low-taper fade with height on top, like a quiff or pompadour, to elongate the face. For square faces, select softer styles, such as a textured crop or side part, to balance angular features.
Face Shape Matching Table:
| Face Shape | Best Styles | Why It Works | Avoid |
|---|---|---|---|
| Oval | Almost anything works | Your face is naturally balanced | Nothing—you’re lucky |
| Round | Quiff, pompadour, textured crop | Adding height makes your face look longer | Flat styles, middle parts |
| Square | Textured crop, side part, curtain bangs | Softens your strong jawline | Sharp, geometric fringes like the Edgar |
| Diamond | Fringe styles, textured top, faux hawk | Balances wide cheekbones | Too much volume on the sides |
| Oblong (Rectangular) | Side part, fringe, messy styles | Avoids making your face look even longer | Super high volume on top |
| Heart | Curtain bangs, middle part, messy styles | Balances a wide forehead | High, swept-back styles |
Hair Type Guide (Straight Hair Specific)
For Fine or Thin Straight Hair:
Best Styles: Blowout, textured crop, messy styles anything that creates the illusion of volume.
Barber Tip: Tell your barber to remove weight and add choppy layers. This gives thin hair movement and body, rather than just lying flat.
Product Must-Have: Always use texture powder or mousse before blow-drying. Straight hair won’t hold volume without it.
Avoid: Slick-back styles (they can show your scalp) and super-long hair (it looks stringy when it’s thin).
For Thick Straight Hair:
Best Styles: Classic slick-back, side-part, Edgar cut, long-hair variations.
Barber Tip: Ask for “heavy thinning” or “weight removal” on top. Otherwise, thick hair can look like a helmet.
Product: Use matte clay or lightweight cream. Avoid heavy pomades—they make thick hair look greasy.
Avoid: Styles that need a ton of volume (you already have it naturally).
For Asian Straight Hair:
Asian hair is usually very dense, very straight, and naturally flat. It’s got unique properties that make certain styles work better than others.
Best Styles: Textured crop, curtain bangs, Edgar cut, blowout (with texture powder to create grip).
Barber Tip: Ask for a “compressed low taper” for maximum contrast. Asian hair’s density holds the fade shape exceptionally well; you can get super sharp lines that last.
Product: Sea salt spray plus matte clay for texture and separation.
Combined Decision Matrix (Face Shape Plus Hair Type)
Here’s a quick cheat sheet:
| If You Have… | Choose This Style |
|---|---|
| Round face plus thin straight hair | Blowout low taper or quiff (adds height and volume) |
| Square face plus thick straight hair | Textured crop (softens angles, removes weight) |
| Oval face plus any straight hair | Anything, experiment and have fun |
| Heart face plus fine straight hair | Curtain bangs (balances forehead, adds body) |
| Diamond face plus Asian straight hair | Edgar cut or textured crop (balances cheekbones) |
Tip #3: When in doubt, start with a classic slicked-back or textured crop. They’re universally flattering and easy to adjust at your next visit to the barber, based on how your hair responds to the cut.
The matrix above gives you a shortcut, but a biometric face scan gives you a definitive answer. TaperMatch maps your jaw angle, facial proportions, and hair density to identify exactly which variation suits your structure.
How to Ask Your Barber for a Low Taper Fade on Straight Hair (Exact Scripts)

Tell your barber: “I want a low taper fade starting just above my ears, blended with a number 1 to number 3 guard. Leave 3 to 4 inches on top with texture. I have straight hair, so precision blending is critical.”
Here’s the thing: Most bad haircuts happen because of bad communication, not bad barbers. If you walk in and just say “give me a fade,” you’re rolling the dice.
Instead, use these word-for-word scripts.
What to Say (Word-for-Word Script)
Basic Script:
“I want a low taper fade on the sides, starting just above my ears and blending up gradually. Use a number 1 or number 2 guard at the base and blend up to a number 3. Leave [tell them how many inches] on top with [describe the top style textured, slicked, messy, whatever]. I have straight hair, so I need the blend to be seamless no harsh lines.”
Advanced Script (If You Already Know Your Style):
“I want a [say the style name: blowout, textured crop, slick back, whatever] with a low taper fade. Start the taper at the ear line, use numbers 1 to 3 guards for the blend, and give me [X inches] on top. For the top, I need [heavy texturizing, layers, point-cutting, whatever your style needs] because my hair is straight and falls flat. Clean up the neckline with a [rounded, squared, or tapered] finish. Sharp edge-up on the hairline.”
What to Bring to Your Appointment
Show up prepared, and you’ll get way better results.
Bring 3 Reference Photos:
- Front view of the style
- Side view showing where the fade starts
- Back view showing the neckline
Specify These 5 Details:
- Fade starting position: “Low just above the ears.”
- Clipper guard numbers: “Number 1 at the base, blend to number 3”
- Top length: Say it in inches “3 to 4 inches” (or show with your fingers)
- Top texture: “Heavily textured,” or “Choppy layers,” or “Smooth and even.”
- Neckline style: “Rounded,” “Squared,” or “Tapered.”
Questions to Ask Your Barber
Good barbers appreciate it when you ask questions. It shows you care about the result.
- “What guard numbers will you use for the blend?” (Makes sure you’re on the same page about how subtle or bold the fade will be)
- “How often should I come back to maintain this?” (Sets your maintenance expectations)
- “Can you show me how to style this at home?” (Some barbers will give you a quick tutorial always worth asking)
Tip #4: Barbers love clients who communicate clearly. The more specific you are, the better your haircut will be. This is especially true with straight hair, where every blending mistake shows up.
Every script above gets even more effective when your barber has a printed brief in hand. TaperMatch generates one from your face scan, exact guard numbers, top length, texture instructions, and a verbatim phrase ready to read aloud at the chair.
How to Style a Low Taper Fade with Straight Hair at Home
Getting the haircut is only half the battle. Knowing how to style it at home is what makes it look good every single day.
Here are the exact routines for each style type.
Daily Styling Routine (5-Minute Version)
For slick back or side part styles:
- Start with damp hair towel-dry until it’s barely wet
- Scoop a dime-sized amount of strong-hold pomade into your palm
- Rub it between your hands
- Run your hands through your hair, coating everything evenly
- Use a fine-tooth comb to slick your hair back (or to the side)
- Blow-dry on low heat while combing to lock the shape
- Finish with cool air for 30 seconds to set the shine
For Messy or Textured Styles:
- Make sure your hair is completely dry (not even a little damp)
- Rub matte clay between your palms until it warms up
- Run your fingers through your hair in random directions no combing
- Lift and twist small sections to create separation
- Optional: Spray texture spray for extra grip
For Blowout Styles:
- Start with damp hair
- Sprinkle texture powder on your roots or spray mousse all over
- Use a blow-dryer and a round brush
- Blow-dry upward, lifting at the roots with the brush
- Once dry, spray sea salt and scrunch with your fingers
- Finish with cool air to lock the volume
Product Guide for Straight Hair
Different styles need different products. Here’s what to use for each.
Product Pairing by Style:
| Style Type | Primary Product | Secondary Product | Purpose |
|---|---|---|---|
| Slick back, side part | Strong-hold pomade | Enhancement spray | Shine plus all-day hold |
| Messy, textured | Matte clay | Texture spray | No-shine texture plus separation |
| Blowout | Texture powder | Sea salt spray | Volume plus grip for flat hair |
| Long hair | Strong-hold gel | Leave-in conditioner | Control plus manageability |
| Fringe styles | Matte paste | Edge control | Defined fringe plus clean lineup |
Common Styling Mistakes on Straight Hair
Here are the mistakes almost every guy makes at first and how to avoid them:
Using too much product: Straight hair shows product buildup instantly. Start with a pea-sized amount and add more only if you need it.
Styling wet hair for messy looks: Moisture makes straight hair clump together. For messy, textured styles, always work with completely dry hair.
Skipping texture powder for blowouts: Straight hair won’t hold volume without something to give it grip. Texture powder or mousse is non-negotiable.
Using shiny products for textured styles: Shine kills texture. If you want a messy look, always use matte products never pomade.
Tip #5: Get a good blow-dryer with a cool air button. It’s the secret weapon for straight hair. Hot air shapes your hair, cool air locks it in place. Always finish with 30 seconds of cool air to set your style for the entire day.
How to Maintain a Low Taper Fade on Straight Hair
The fade looks sharpest right after your visit to the barber. But with the right maintenance, you can keep it looking fresh for weeks.
Barber Visit Frequency
Maintain a low taper fade on straight hair with barber trims every 3 to 4 weeks. Straight hair holds the fade’s shape longer than textured hair because it grows evenly. Between visits, use clippers for neckline touch-ups.
Maintenance Schedule:
- Every 3 to 4 weeks: Full fade refresh at the barbershop
- Every 2 weeks (optional): DIY neckline cleanup with clippers at home
- Weekly: Wash with clarifying shampoo to remove product buildup
Why Straight Hair Maintenance Is Easier:
Straight hair grows evenly and predictably. The fade doesn’t lose its shape as fast as it does on curly or wavy hair.
Fact #2: According to barber maintenance data compiled by The Barbershop Network, men with straight hair average 3.5 weeks between fade trims, compared to 2.1 weeks for men with curly hair.
At-Home Maintenance Tips
You can stretch the time between barber visits by doing some simple touch-ups at home.
Neckline Touch-Ups:
- Grab a trimmer with a number 0 or number 1 guard
- Follow the original neckline shape your barber created
- Clean up any hair growing below that line
- Never touch the fade itself, leave the blending to the professional
Product Buildup Prevention:
- Use clarifying shampoo once a week
- Buildup makes your fade look dull and dirty
- Clean hair highlights the precision of the cut
Edge-Up Maintenance:
- Use a small trimmer or edge brush to maintain the sharp hairline at your temples
- Do this every 5 to 7 days
- Keeps the fade looking crisp between full haircuts
When to Get a Haircut vs. a Trim
There’s a difference, and knowing which one you need saves you money.
- Trim (every 3 to 4 weeks): Refresh the fade, clean up the neckline, and maintain your current style
- Full Haircut (every 8 to 12 weeks): Re-shape the top, adjust your style, change the length
Best Products for Low Taper Fade Straight Hair
You don’t need a million products. Just these five essentials will cover almost every style.
Top 5 Must-Have Products
1. Texture Powder (For Volume on Flat Straight Hair)
Purpose: Creates grip and lift at the roots. This is absolutely critical for blowout and messy styles on straight hair.
How to Use: Sprinkle it on damp roots before blow-drying. A little goes a long way.
Recommended For: Fine or thin straight hair, blowout styles, and any time you need volume.
2. Matte Clay (For Textured, No-Shine Styles)
Purpose: Gives you a strong hold with zero shine. Perfect for messy, textured, lived-in looks.
How to Use: Warm it up between your palms, then apply to completely dry hair. Use your fingers, never a comb.
Recommended For: Messy styles, Edgar cut, textured crop, anything where you want texture without shine.
3. Strong-Hold Pomade (For Slick Styles)
Purpose: All-day hold with high shine. This is your go-to for slicked-back or side-parted styles.
How to Use: Apply to damp hair, comb into place, blow-dry to set.
Recommended For: Slick back, side part, long hair styles, formal looks.
4. Sea Salt Spray (For Natural Texture)
Purpose: Adds beachy texture and volume without making your hair feel heavy or sticky.
How to Use: Spray on damp or dry hair, scrunch with your fingers.
Recommended For: Blowout styles, messy looks, curtain bangs.
5. Clarifying Shampoo (For Buildup Removal)
Purpose: Deep-cleans all the product buildup that regular shampoo leaves behind. Buildup makes your fade look dull and dirty.
How to Use: Wash once a week in place of your regular shampoo.
Recommended For: Everyone, this is essential weekly maintenance for any styled haircut.
Product Application Guide
General Rules for Straight Hair:
- Less is more: Start with a pea-sized amount. Straight hair shows product instantly, so you can always add more if needed.
- Damp hair for hold products: Pomade, gel, and cream can be applied to hair that is damp (not soaking).
- Dry hair for texture products: Matte clay, texture spray, wax. These work best on completely dry hair.
- Always finish with cool air: After blow-drying, hit your hair with 30 seconds of cool air. It locks in your product and style.
Low Taper Fade Straight Hair: Pros and Cons
Let’s be real, no haircut is perfect for everyone. Here’s what’s great about the low taper fade on straight hair, and what you should think about before getting it.
Pros (Why This Cut Works)
Versatile: Works for professional settings, casual hangouts, formal events, and athletic activities. It’s basically the Swiss Army knife of haircuts.
Low Maintenance: You’re looking at 3 to 4 weeks between barber visits and 3 to 5 minutes of daily styling. Compare that to high fades (2 weeks) or complicated styles (15 minutes daily).
Universally Flattering: With the right variation, this cut works for almost every face shape. Oval, round, square, heart, diamond there’s a version for you.
Precision Highlight: Straight hair beautifully showcases the fade’s craftsmanship. Every line is clean and visible.
Volume Control: Removes weight from the sides, preventing the dreaded helmet look that straight hair can sometimes have.
Trend-Proof: This isn’t a flash-in-the-pan TikTok trend. The low taper fade is classic enough that it won’t look dated in 2 to 3 years.
Cons (What to Consider)
Requires a Skilled Barber: Straight hair reveals every blending mistake. You can’t just walk into any random barbershop you need to find someone experienced with fades.
Regular Trims Needed: The fade starts to lose its sharpness after 3 to 4 weeks. If you hate going to the barber, this might get annoying.
Flat Hair Challenge: Straight hair on top can look lifeless without proper styling or the right products. You’ll need to put in at least a little effort most mornings.
Not Ideal for Very Fine Hair: If your hair is extremely thin, the fade on the sides might expose your scalp more than you’d like.
Initial Styling Learning Curve: The first 1 to 2 weeks after getting the cut, you’ll be figuring out how to style it. Don’t get discouraged; it gets easier.
Frequently Asked Questions
How long does a low taper fade last on straight hair?
A low taper fade on straight hair maintains a sharp appearance for 3 to 4 weeks before needing a trim. Straight hair grows more evenly than curly or wavy textures, which allows the fade to hold its shape longer. For maximum freshness, schedule barber visits every 3 weeks.
Can I get a low-taper fade if I have very thin, straight hair?
Yes, absolutely but choose styles that add volume. Blowout, textured crop, or messy styles work best because they create the illusion of density. Avoid slick back styles because they can expose your scalp. Ask your barber to leave more length on top (3 to 4 inches minimum) and add choppy texture to create body.
What’s the difference between a low taper and a low fade on straight hair?
A taper gradually shortens your hair using scissors or clippers, blending at the sideburns and neckline. A fade goes further, it cuts down to skin level (or near-skin) using clipper guards like a number 0 or number 1. A “low taper fade” combines both techniques. It tapers AND fades, starting low on your head just above the ears.
What clipper guard numbers should my barber use for a low taper fade?
Most barbers use a number 0 or number 1 guard at the base (just above your ears and neckline), then blend upward to a number 2 or number 3 guard. The exact guards depend on how subtle or bold you want the contrast. Ask your barber to show you the guards before they start cutting so you’re on the same page.
How do I add volume to straight hair with a low taper fade?
Use texture powder or mousse at the roots before blow-drying. Blow-dry upward with a round brush to lift the hair away from your scalp. Ask your barber to remove weight and add layers on top during the cut this gives straight hair movement and prevents it from lying flat. Avoid heavy products like strong-hold gel, which weigh hair down.
Is a low taper fade professional enough for corporate jobs?
Yes, it’s actually one of the most office-appropriate fades you can get. The low placement keeps the fade subtle and conservative. Pair it with classic styles like a slicked-back, side-parted, or crew cut, and maintain regular trims every 3 weeks to keep it looking sharp and polished.
Can I style a low taper fade without product?
Yes, if you go with ultra-short styles like a crew cut or a low-tapered buzz cut. For most other styles, a small amount of product (matte clay, lightweight cream, or sea salt spray) helps enhance texture and hold. But the beauty of straight hair is that it can look clean and neat, even product-free, if the cut is done well.
Does a low taper fade work with long straight hair?
Absolutely. A low taper fade with 5 to 7 inches on top creates a sleek, modern contrast. You can slick the long top back, style it forward, or even tie it into a man bun. The low taper keeps the sides clean and structured, making the long hair on top look intentional rather than messy.